Acrylic nails, aka fashion nails, are ideal if you have non-existent nails or your nails lack strength.
These nails mimic the appearance of natural nails. However, before getting them done, you should be aware of the pros and cons of acrylic nails.
Acrylic nails are for you if you want to attend every special occasion or wedding with stylish nails or appreciate well-groomed and manicured nails. In the 21st century, anything is possible. So go for it, don’t hesitate!
Blair, a blogger, shared her experience of getting acrylic nails and being obsessed with them. She said, “I have had a really good experience with acrylics. I’m sure there are horror stories out there and people saying they’ll never get them because they’re harmful and blah blah. I have to admit this is what kept me from getting acrylics for quite a while – just the whole stigma that my nails would be forever ruined and get infected. But finally, I just wanted to try them and figured it couldn’t be that dramatic, and went in to get them done. I was immediately hooked ( i )!” Also, the blogger was pleased with the color after getting her nails done.
Experts say it is recommended to get acrylic nails done by a professional because you can not do it smoothly at your home . Moreover, it needs special training to be done. So, you should only attempt it at home if you are a manicurist or trained expert.


- Maintenance : Get your acrylic nails filed every two to three weeks to prevent damage and maintain their finesse.
- Removal : While there are convenient home remedies to remove acrylic nails like acetone and electric nail files, it is preferable to have your acrylic nails professionally removed in order to protect your natural nails. Especially if you are a beginner.
- Caution : The chemicals used in acrylic nails may cause adverse responses in people with sensitive skin. It’s important to check the ingredients before use.
In This Article
Pros And Cons of Acrylic Nails
Pros
- Acrylic extensions are suitable for women with brittle and weak nails. Belen, a lifestyle blogger trained in the application of acrylic nails, shares some pros and cons of acrylics in her blog. She points out, “If your natural nails are prone to snapping or breaking, then acrylic nails may be good for you as they will give strength to the nail. Note that they won’t make your natural nails stronger but the acrylic layer, while applied, will give extra strength and support to the nail overall ( ii ).”
- Acrylics are good for women, who have a bad habit of chewing their nails as they are very hard to chew off. What better way to ward off an unwanted habit than making the damaged area as pretty as possible?
- Acrylic nails have been around longer than their counterparts, so, most nail technicians at salons and spas have a lot of experience about how to apply and remove these nails . You don’t have to worry about side effects as such.
- They have the affordability advantage. The lighter the wallet, the more the happiness. Agree?
- One of the primary benefits of acrylic nails is that if one of them breaks, it can be fixed at home by using the right tools. You don’t have to spend a bomb again to get them rectified.
- They last longer than gel nails.
Cons
- They can damage your natural nails underneath, and it can be hard to grow out your nails with acrylic over them. Also, a damaged nail is a breeding ground for fungus and bacteria.
- As Acrylic nails are artificial enhancements, they present a fake look . You need a very talented technician who can apply your acrylics as close to natural ones.
- Application of acrylic nails involves the use of strong chemicals and formation of fumes. Some women may have an allergy to such substances.
- You need refilling every month which means extra expenditure.
Now, let’s look at the steps to be followed to apply these nails.
Key Takeaways
- Acrylic nails are durable, cheaper, and offer you a broader range of creativity to engage in.
- You need to prep your nails properly before getting acrylic nails to ensure they last longer and your nails are healthy.
- However, prolonged use may weaken your natural nails and discolor them.
- If you suffer from the undesirable habit of chewing your nails, acrylic nails offer a more sturdy and harder-to-chew alternative to stem your habit.
How To Apply Acrylic Nails
Step 1: Prep The Nails
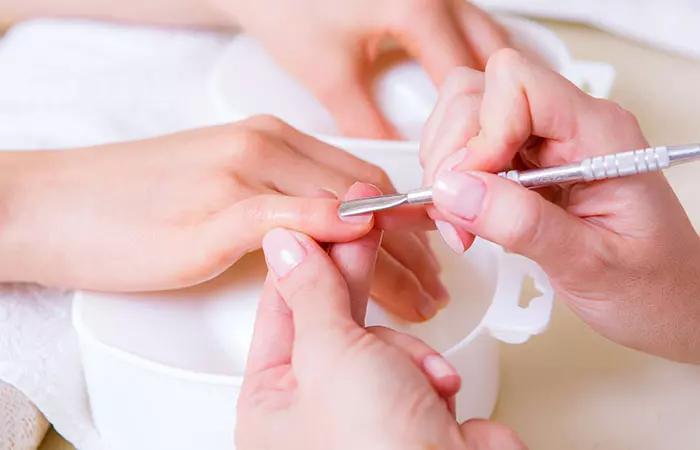
Image: Shutterstock
Always start with clean nails. Providing a smooth base helps the acrylic material to go on better. Remove any nail polish and push back the cuticles.
Step 2: Trim Nails
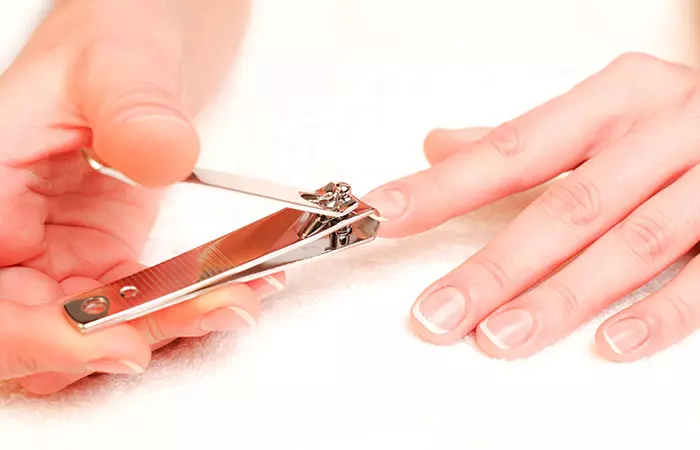
Image: Shutterstock
The manicurist will probably trim and file your nails while leaving a few millimeters so that the nail extension can be stuck.
Step 3: Buff Nails

Image: Shutterstock
She will then buff your nails so that the surface of your nails are a little rough. This rough surface makes it easy for the acrylic to stick to.
Step 4: Nail Primer
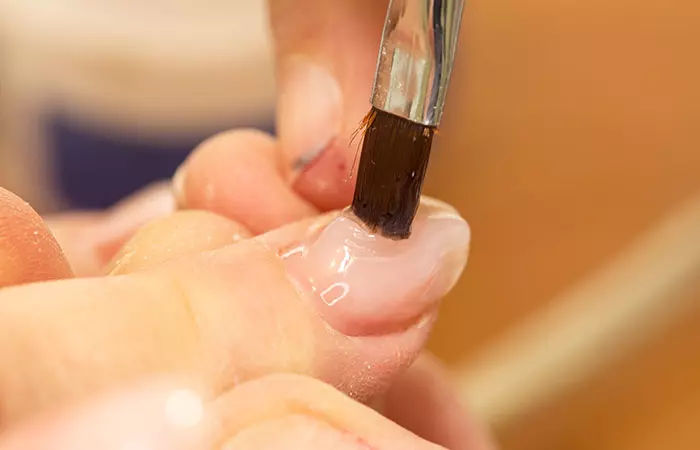
Image: Shutterstock
A nail primer would be used to remove any remaining moisture and oil from the nails. Use a cotton swab with acetone to clean the nails and then apply the primer over the nails. Some of the primers contain an acid called methacrylic acid. Be careful as it may burn. You can also use the acid-free primer if you are unsure.
Step 5: Application Of The Tips

Image: Shutterstock
This is where the actual application begins. Mastering how to apply nail extensions is essential for achieving the perfect look with acrylic nails. The tips would be filed according to your nails and will be applied with glue to your real nails. The glue should not touch your skin. The nail can be cut and sized according to your specifications.
Step 6: Prepare The Acrylic Material

Image: Shutterstock
The acrylic liquid would be poured into an acrylic dish and some of the powder into another dish.
A word of caution: One of the drawbacks is that the fumes are strong while using acrylics so this should be done in a well ventilated area.
Step 7: Pick Up The Acrylic With The Brush
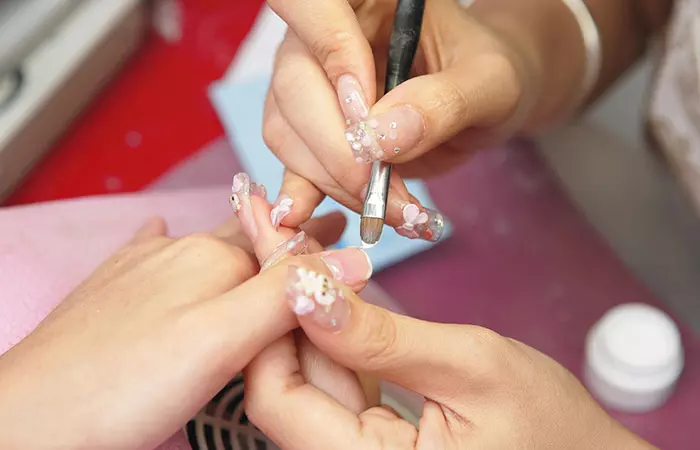
Image: Shutterstock
The manicurist will dip the brush all the way down into the liquid. Make sure there are no bubbles. She will brush any excess liquid against the side of the dish to prevent it from dripping. Then, she will run the brush against the powder so that you get a moist ball. This is the material that is to be spread on the nail.
Step 8: Apply The Mixture
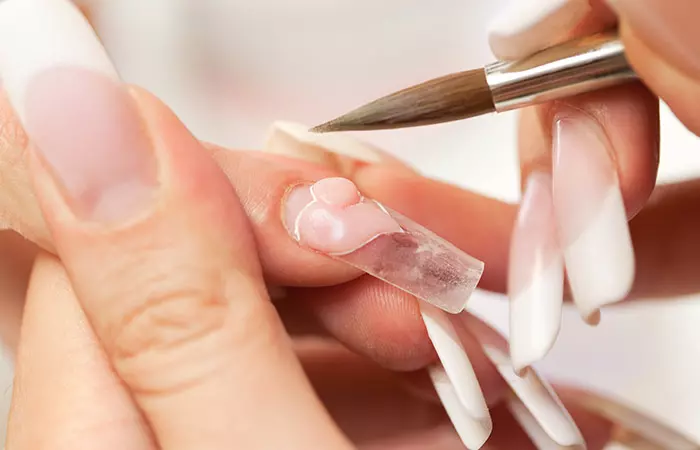
Image: Shutterstock
Without touching the cuticles, she will apply the mixture over your nails and smoothen it out as it is being applied. The transition between the tip and your natural nails should be smooth . Apply another layer if required.
Step 9: Let It Dry
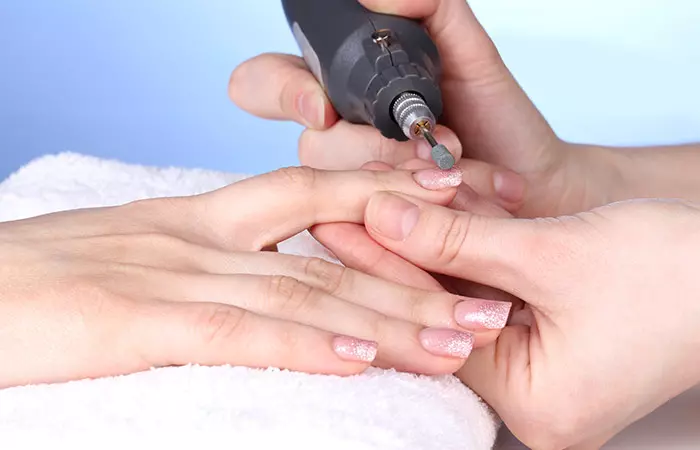
Image: Shutterstock
It should take about ten minutes to dry. Once this is done, buff and file the nails to make them smooth.
Step 10: Finishing Touches
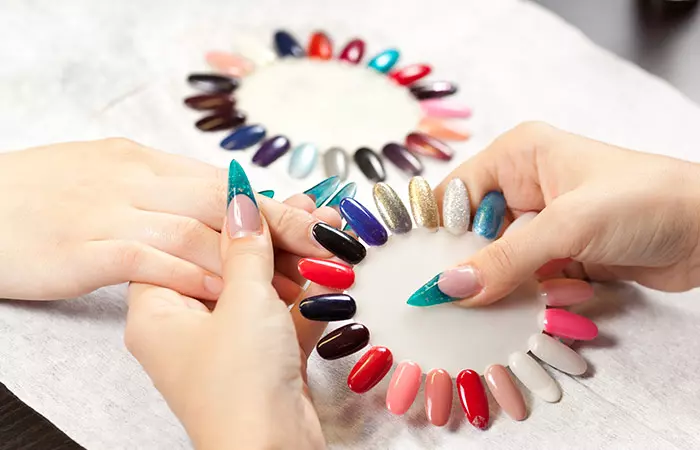
Image: Shutterstock
Your nails are ready to be painted! Choose from various experimental acrylic nail designs to find your style and flaunt it confidently.

Things You Must Remember When Getting Acrylic Nails
- Keep Your Nails Healthy: It is extremely important to keep cleaning your nails. Especially since there is an entire layer covering your real nails. Make it a point to regularly clean your acrylic nails. Use a soft bristle brush under and around the nails to clean hard dirt. Then use a cotton swab with some alcohol to clean around the cuticles and under the nails.
- Find Yourself A Regular Manicurist: Finding a manicurist that you can regularly go to makes life so much easier. She will understand your concerns, and since she knows your nail’s weaknesses, negative aspects, and your problems as well as the good points, you can save time trying to explain.
- Keep Your Nails Dry: Whenever you wash your hands, dry them completely! If you leave them wet, there are chances for your acrylic layers to lift and also a fungal growth! This may be considered a disadvantage, but you need to wear gloves if you are doing the dishes.
- Oil Your Nails: Dry nails can break easily. Use a neutral oil such as rapeseed oil to keep them moisturized.
- Maintain The Look Of Your Acrylic Nails: Maintaining the healthy shine and seamless look of your acrylics is very important. Lightly buff the nails and apply a top coat every few days to prevent dullness and chipping. If you notice any chips in the corners, gently file them to prevent cracking. Use high-quality nail glue to press down the edges if they start lifting. One prominent tip is to avoid using your nails as tools. For example, do not use nails to open cans, scrape surfaces, or peel adhesive stickers. These will lift the nails and cause cracking.
In case of mishaps like cracking or lifting, you can restore the original shine and finish of your acrylics with basic nail equipment. Ruhee, a beauty blogger, shares, “If you are worried about repairing your acrylic nail polish at some point in the future, fear not! Acrylic nails are incredibly easy to repair. If one nail breaks off or cracks during application or removal, then file it down or gently trim it off and apply some clear coat over the top until it has healed completely. Then apply another coat of polish over this patchwork repair job so as not to notice where the original break occurred within reach of your fingers ( iii )!”
Image: Shutterstock
Besides acrylic, gel nails are also widely used in nail styling. But there are some differences between these two. Scroll down to know more.
Acrylic Vs. Gel Nails
Understanding the difference between acrylic and gel nails can help you make an informed choice when opting for acrylic nails.
Acrylic nails are created with liquid monomer and powder polymer that hardens when exposed to air. They are durable, long-lasting, and offer a robust extension for nails, ideal for those seeking added length and strength. However, they can appear thicker and require regular maintenance.
Gel nails, on the other hand, involve applying gel polish that is cured under LED or UV lamps. They provide a natural, glossy look and tend to be more flexible and lightweight compared to acrylics. Gel nails offer a smoother finish and are less likely to cause damage to the natural nail during removal, but they may not be as durable as acrylics.
Both offer beautiful results, so selecting the right option often comes down to individual needs and nail care habits.
In addition to gel and acrylic nails, there are also other nail enhancement and beautification options available. Each one offers certain pros, from durability and shine to strength. In the next section, we have explored the performance of dip powder nails, press-on nails, and poly gel nails in comparison to acrylics.
Acrylic Nails Vs. Other Nail Enhancement Options
Acrylic nails are durable and robust nail extension options, but they are prone to lifting and cracking if not cared for properly. Additionally, the chemicals used in the acrylics have a strong smell that may be unpleasant for some noses. If you are one among them, you can consider other nail enhancement options like dip powder nails and poly gel nails. Another innovation of the nail industry, press-on nails, has created a rage owing to their quick and mess-free application. Below, we have compared the three nail enhancement options with acrylic nails and jotted down the pros and cons. Read on to make an informed choice for your nail aesthetic needs.
Acrylic Nails Vs. Dip Powder Nails
Dip Powder nails involve dipping the nails into pigmented powder and sealing the powdered nails with an activator. The application process is messy compared to getting acrylic nail extensions. However, dip powder nails are lighter and more flexible than acrylics. They offer a more natural look and their odor-free formula is better preferred by people who are allergic to strong smells. Dip powder nails are a low-maintenance option, but they do not provide the dramatic length that acrylics do.
Acrylic Nails Vs. Poly Gel Nails
Poly gel formulas have a putty-like consistency that gets sculpted onto the nails for a more natural feel. The major drawback of poly gels is that they take a long time to harden. On the flip side, this allows for more shaping time, allowing you to achieve a personalized look. Poly gel nails feel lighter on the nails as well. However, this nail enhancement option is more expensive than acrylics.
Acrylic Nails Vs. Press-On Nails
Press-on nails are pre-made artificial nails that stick onto the real nails with high-strength adhesive tabs. These are quick, non-intrusive alternatives to acrylics. They are easy to remove and apply. However, they can pop off your nails after some days of use, unlike acrylics, which are meant to stay for a long time.
Infographic: Steps For Easy Application Of Acrylic Nails
Applying acrylic nails at home is a great way to save money and still look fabulous. With the right supplies and a little practice, you can get a professional-looking manicure in the comfort of your home. We have put together an easy step-by-step process in the infographic below to help you master the art. Check it out!
Make sure you are very much thorough with the various pros and cons of acrylic nails before you go for them. Get your acrylic nails done by a professional manicurist, as it can be a hassle to do them on your own. Also, always clean your nails after the procedure is over since you would definitely not want any dirt or germs to cause complications later. Acrylic nails have many positive aspects. They are long-lasting and if done in the right way, they look gorgeous, make your nails appear well-groomed, and enhance the overall appearance of your hands. You can also find amazing acrylic nail ideas online. Go ahead and give it a try.
How long do acrylic nails last?
Acrylic nails last between two to three weeks before needing a refill. It depends on individual nail growth and care practices. Regular maintenance and professional application can however extend their lifespan.
Do acrylics ruin your nails?
Prolonged use of acrylics has downsides and will weaken and stain your natural nails. Additionally, poor application and removal of acrylics can leave your nails thin and brittle.
Is acrylic better than gel nails?
Acrylic nails are sturdy and have a more creative scope. However, gel nails last longer without chipping and may also be healthier for your nails as they do not contain toxic chemicals like toluene or methyl methacrylate. Consult a professional and understand your options before choosing the one that is suitable for you.
Do acrylics help your nails grow?
No, acrylics are not capable of making your nails grow.
Illustration: Pros And Cons of Acrylic Nails | How To Apply Acrylic Nails
Image: Stable Diffusion/StyleCraze Design Team
Explore the pros and cons of acrylic nails and details about the latest nail trends! Play this video to decide what is right for you or to pick something completely new.
Personal Experience: Source
StyleCraze’s articles are interwoven with authentic personal narratives that provide depth and resonance to our content. Below are the sources of the personal accounts referenced in this article.


Community Experiences
Join the conversation and become a part of our empowering community! Share your stories, experiences, and insights to connect with other beauty, lifestyle, and health enthusiasts.


Of all the beauty trends that have come and gone, acrylic nails have remained a staple for many women, especially those who feel like their nails never grow. With endless acrylic nail designs to choose from, it’s no wonder why this trend has stood the test of time. Since acrylic nails are a combination of liquid monomer and powder polymer, when applied to your nails and exposed to the air, they form a hard layer, so you are guaranteed to have cute and strong nails for at least 3 to 4 weeks.
Whether you’re a seasoned pro or a newbie to the world of acrylics, we have compiled a list of 51 top acrylic nail ideas and designs for women to try. Get ready to be inspired and take your nails to the next level!
- Apply In A Cool Setting: Apply In A Cool Setting Acrylic nails are temperature sensitive. Apply them in a cool setting so that they do not dry off quickly, and it is easier to make changes if you make an error.
- Caution: Apply In A Cool Setting Acrylic can weaken your natural nails because the surface of the nail has to be filled every time for the acyclic to bond.
- Maintenance: Apply In A Cool Setting Avoid prolonged exposure to water and wear protective gloves while cleaning or washing things at home to maintain acrylic nails.
In This Article
Top 51 Cute Acrylic Nail Designs That You Must Try!
We’ve just made your life just that much easier by compiling a list of the best acrylic nail art. Natali, a YouTube vlogger, shared her tips on doing acrylic nails. She explained the basic prerequisites, “Remove that shine from the natural nail. If you guys don’t know, our body produces a lot of natural oils. Those oils happen to be on our nails, and so, if we just apply the acrylic or the nail tip right over a shiny nail, they’re going to come off literally the same day if not right after. They’re not going to stay on for very long ( i ).” Let’s begin without further ado!

1. Summer Acrylic Nails With Beachy Waves
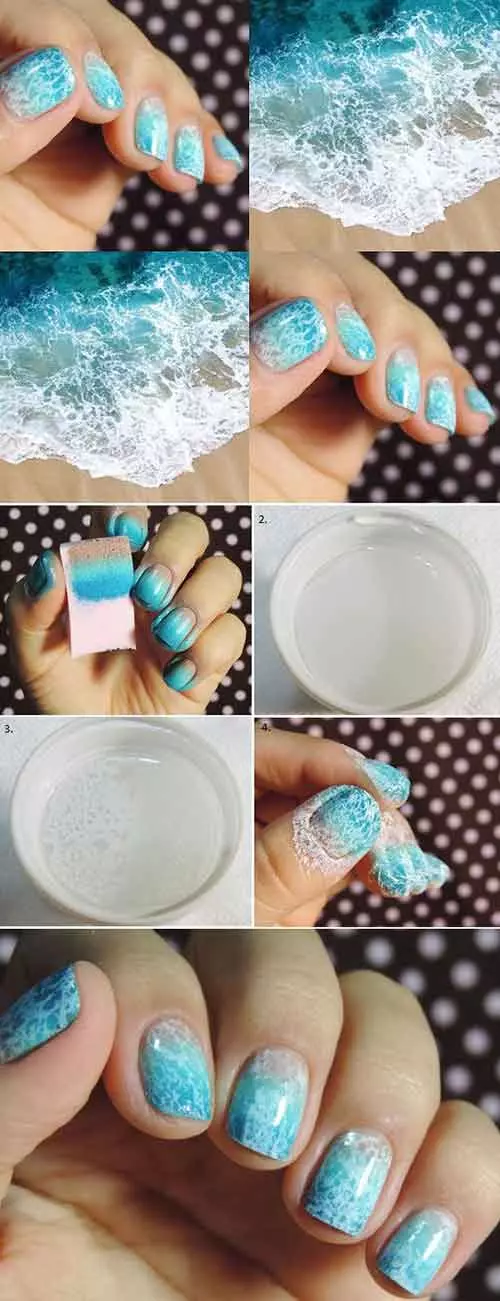
Image:Source
Seeing this nail art makes me want to pack my bags as soon as possible and fly off to a remote island somewhere. It’s so serene to look at! Blue is supposed to be a calming color. So when colors like white, light brown and blue are combined to create this beautiful beachy nail art in this way, it brings peace and relaxation.
What You Will Need
- Sea blue nail polish
- Light blue nail polish
- Light brown nail polish
- White nail polish
- Top coat
- Bowl of water
- Nail polish remover in a spray bottle
How To Apply?
- On a sponge, apply the sea blue, light blue and light brown shades.
- Dab it onto your nail, the brown near your cuticle. This will give you an ombre effect
- Now, in the bowl of water, add a drop or two of white polish.
- Spray some nail polish remover in the bowl to break up the nail polish slightly.
- Dip your nails one by one in water.
- You will achieve the desired look.
- Clean up the sides of your nails with some nail polish remover.
- Finally, add a top coat, and you’re all done!
2. Spring Acrylic Nails With An Ombre
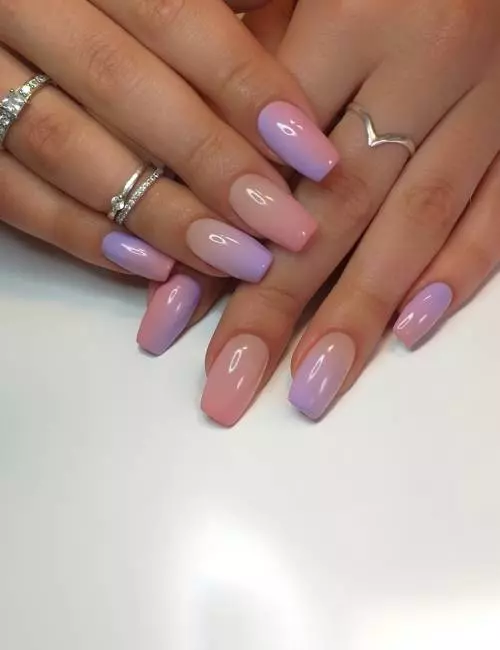
Image: Shutterstock.
If you’re not a fan of huge nails, but rather a shorter alternative, then we’ve got you covered. This beautiful ombre nail art is not only easy to achieve, but it’s a perfect go-to option during the lovely spring time.
What You Will Need
- Periwinkle nail polish
- Light purple nail polish
- Nude-pink nail polish
- Liquid latex or tape
- Makeup sponge
- White nail polish
- Top coat
How To Apply?
- Paint all your nails with white as the base shade.
- Apply either liquid latex or tape around your nail to prevent it from getting the polish on your skin.
- Then, on a makeup sponge, apply stripes of the periwinkle, light purple, and the nude-pink nail polish.
- Dab the sponge onto your nails for an ombre effect. Reapply the polish to the sponge whenever needed.
- Remove the latex or tape and seal it with a top coat.
3. Rainbow Polka Dots
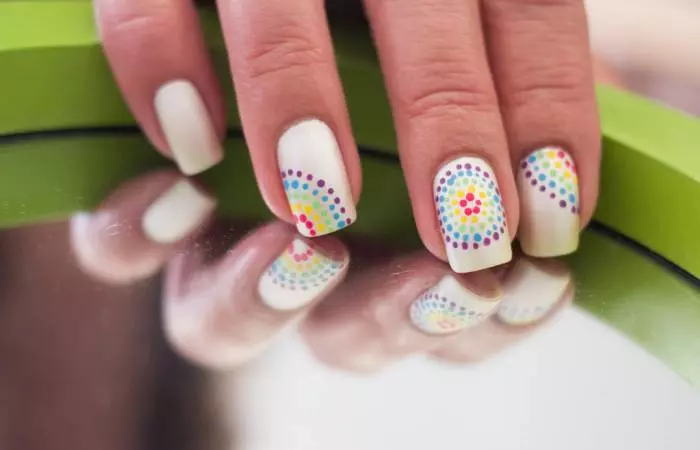
Image: Shutterstock.
This is perfect for Easter! All the colors and the polka dots have such an Easter aesthetic, don’t you think? Or it’s also perfect if you just like bright, fun colors and rainbows! This is super easy to do and doesn’t even need any fancy tools.
What You Will Need
- Yellow nail polish
- Purple nail polish
- Blue nail polish
- Green nail polish
- Pink nail polish
- White nail polish
- Bobby pin
- Top Coat
How To Apply?
- Paint the fingers white.
- Now comes the fun part. Use the bobby pin dipped in polish to create polka dots in the bottom half of the nails, corner or in the middle.
- You can create your own version of the order of colors.
- That’s all! Easy, isn’t it? Now all you need to do is finish it off with a top coat.
4. Aztec Nail Art Tutorial
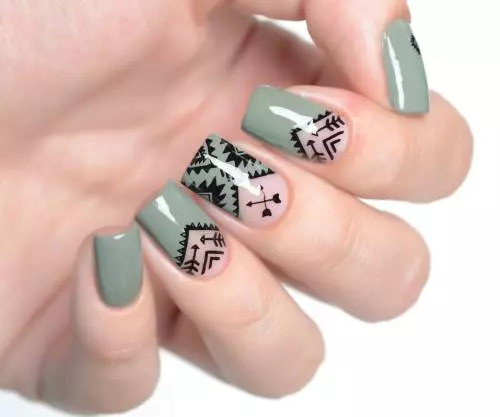
Image: Instagram
Here’s another fun nail art. This one requires a little more patience. But if you follow our step by step instructions along with the pictorial, I’m sure you’ll be able to nail it (hehe)! Go on and take a step further! You’re ready for something a little more advanced.
What You Will Need
- Khaki Green nail polish
- Black nail polish
- Fine brush or nail striper
- Top coat
How To Apply?
- Start by painting your thumb and little fingernails in khaki green.
- Now use the brush dipped in black polish to create a triangle at the center of your nails on the index, ring, and middle fingers
- Now fill the outside of the triangle with khaki green nail polish.
- With the fine brush dipped in black polish, create a small triangle as shown in the nail of the middle finger, and add the zig-zaggy Aztec detailing.
- With the same fine brush dipped in black nail polish, draw the arrows and triangular lines as shown near the base of the cuticle.
- We’ve come to the end of the tutorial, finally! All that is left to do now is to seal it with a top coat!
Try to get yourself aware about various nail art brushes to master the art of acrylic nail designs.
5. Leopard Print Nails
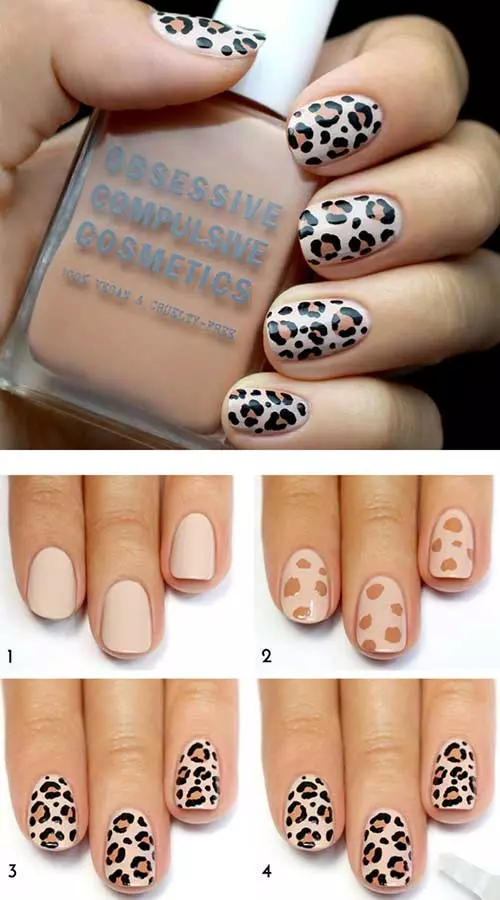
Image:goodhousekeeping.com
Animal prints have always been popular. You see them on shirts, jackets, trousers, shoes, linen, you name it! So it only makes sense that we have a nail art with an animal print on this tutorial list.
What You Will Need
- Light beige nail polish
- Light brown nail polish
- Black nail polish
- Dotting tool or toothpick
- Top coat
How To Apply?
- Paint all your nails with the light beige color as the base.
- With the light brown nail polish, create small blobs all over the nail. They do not have to be perfect.
- Use the dotting tool or toothpick dipped in black nail polish to outline the brown blobs roughly. Leave it open-ended and incomplete. This makes it look more like a leopard print.
- Finish the nail art with a top coat.
6. Red Acrylic Nails With Floral Patterns
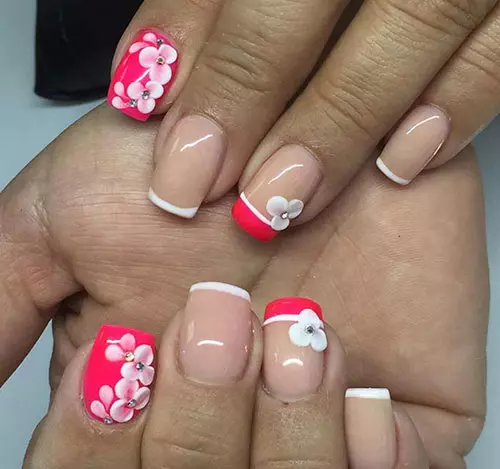
Image:fashionisers.com
If you’re a lover of floral things and a French manicure , why settle for one when you can have the best of both worlds. The red and white floral combination somehow reminds me of when the Red Riding Hood goes out in the woods to pick flowers for her grandmother!
What You Will Need
- Red nail polish
- Nude nail polish
- White nail polish
- Dotting tool
- Small nail jewels
- Top coat
How To Apply?
- Except for the index fingernail, paint everything else with the nude nail polish.
- Paint the index fingernail with red.
- Paint a stripe of red on the tip of the ring fingernail.
- Use a very fine brush to create thin stripes on the tops of the middle fingernail, pinky, and thumb.
- Use the same brush to draw a stripe under the thick red stripe.
- Use a dotting tool to create a floral design for the index and ring fingernails as shown in the image.
- Add the jewels at the center of the petals of the flowers and seal it with a top coat.
7. Short Acrylic Nails With Gray And Pink Glitter
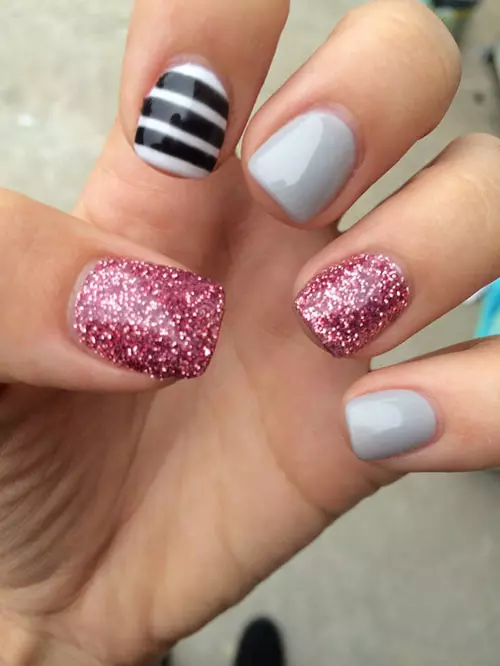
Image:cutediyprojects.com
Another great manicure for someone with short nails! This one can be done so quickly, that it’ll hardly take five minutes! You don’t expect it, but the pink glitter really goes well with the gray and monochrome. It is one of those fabulous nail designs for short nails that packs a punch without needing extra length.
What You Will Need
- Pink glitter nail polish
- Light gray nail polish
- Black nail polish
- White nail polish
- Fine brush
- Top coat
How To Apply?
- Paint the thumb and ring fingernail with the pink glitter polish.
- Paint the middle and pinky fingernail with the light gray nail polish.
- Apply white polish on the index finger and use the fine brush to add on stripes in black.
- Seal the manicure with a good quality top coat.
8. Crescent Moon Vampy Nails
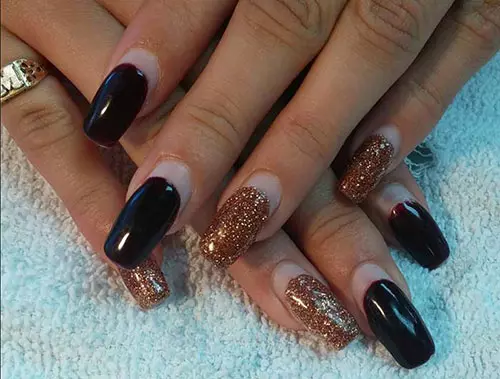
Image:fashionisers.com
These light color acrylic nail arts that I shared so far aren’t for you? Don’t you worry, we’ve got something in store for everyone. I personally love wearing dark shades on my nails. The combination of this nearly-black wine shade with the rose gold is amazing! The crescent moons near the cuticles add some edginess to the whole look.
What You Will Need
- Deep wine nail polish
- Rose gold glitter nail polish
- Top coat
How To Apply?
- Apply the deep wine nail polish on your index and middle fingers. When you do this, make sure you leave the crescent moon shape near the cuticle.
- Following the same thing, by leaving some space near the cuticle, paint the ring fingernail, pinky, and thumb with the rose gold nail polish.
- Seal it with a top coat. It’s as easy as that!
9. Pastel Butterfly Acrylic Nails
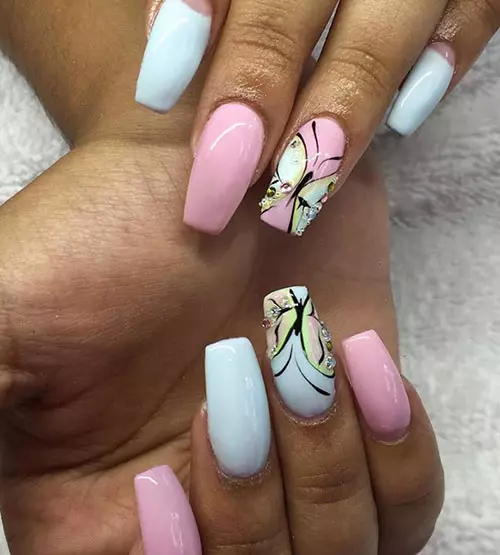
Image:fashionisers.com
Calling all artists! If all the other nail arts were too simple for you, and you would like to incorporate your art skills into your nail art, then give this one a shot. Drawing the butterfly may look easy, but it’s quite challenging, given the small canvas that is your nail. I’m sure you’ll do great though!
What You Will Need
- Pastel pink nail polish
- Pastel blue nail polish
- Light yellow nail polish
- Fine brush
- Nail jewels in a small size
How To Apply?
- Paint your thumb, ring and middle fingers pink.
- Paint the index and pinky fingernails blue.
- Now comes the fun part. Use the fine brush to create a butterfly on the ring fingernail.
- Paint its wings with blue for contrast.
- Use the fine brush to add some yellow on the inside as well.
- To take this manicure up a notch, add some small jewels to the wings of the butterfly.
- Seal it all off with a top coat.
10. Matte Lavender And Snow Nails
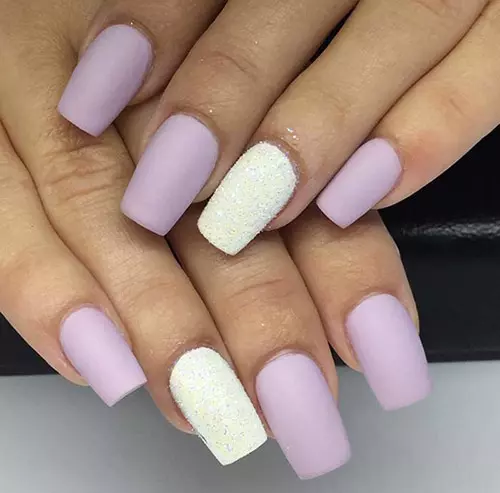
Image:fashionisers.com
As soon as I saw this, I thought of the falling snow! This one is a must try for the winter time! If you aren’t fond of the bright red colors during Christmas and the winters, then this is the one for you! The matte finish of the purple and the white glitter works so well together!
What You Will Need
- Matte Pastel purple nail polish
- White matte nail polish
- Loose white glitter
- Dry flat paint brush
How To Apply?
- Paint all your nails except for the ring fingernail with the matte purple shade.
- Paint the ring fingernail with the white polish.
- While the white polish is still wet, use a flat brush to pick up some loose white glitter and place it onto your nail. That’s all!
11. Tropical Escape
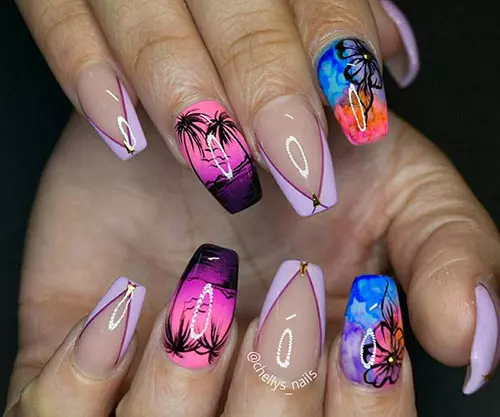
Image:fashionisers.com
Going on a holiday to somewhere warm and tropical? Then, this is the perfect manicure for the occasion! Even if you aren’t going on vacation, but looking for a fun look for the summer, give this one a shot. This one is for the slightly more skilled artists. As you can see, it requires a steady hand for the intricate design. Get an artist friend to help you if you can’t do it yourself! Make a slumber party out of it!
What You Will Need
- Pastel purple nail polish
- Purple nail polish
- Pink nail polish
- Blue nail polish
- Orange nail polish
- Fine brush
- Gold triangle nail sticker
- Top coat
- Nail jewel
- Makeup sponge
How To Apply?
- Apply the pastel purple to the sides of the pinky, middle and thumb fingernails as shown. They should resemble long triangles.
- Use the fine brush in the purple polish and outline the triangles.
- Apply the triangle nail sticker at the point where they meet.
- On a makeup sponge, apply pink and purple polish. Dab it onto your ring fingernail. You should have an ombre of pink and purple. Make sure that the purple is at the tip.
- Now comes the hard part. Using a fine brush in black polish, draw out palm trees, ripples in the water and birds.
- Apply orange, blue and purple with a sponge on your index fingernail.
- Draw out a flower with a fine brush.
- Place a jewel at the center of the flower.
- To complete the manicure, seal it with a top coat so that your artwork can stay safe for days!
12. Mandala Inspired Nail Art
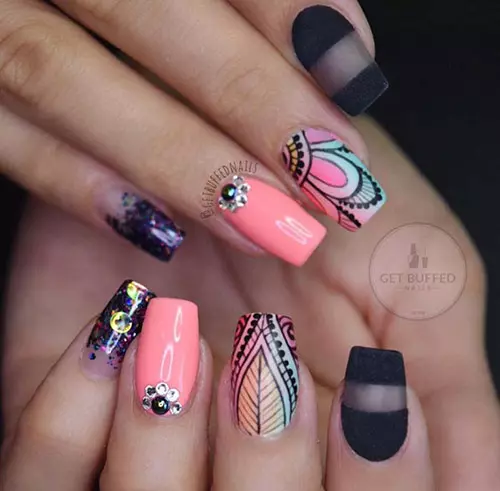
Image:fashionisers.com
A fun and colorful nail art manicure which is ideal for festivals! This is definitely something that you would see at Coachella. Add on some super cute boho rings, and you’re ready to fit right in at the ever-popular music festival.
What You Will Need
- Salmon nail polish
- Pastel yellow nail polish
- Pastel blue nail polish
- Pastel pink polish
- Pastel purple polish
- Fine brush
- Gray matte polish
- Black matte polish
- Rainbow glitter polish
- Nail jewels
- Makeup sponge
How To Apply?
- Paint the ring fingernails with the salmon nail polish.
- On a makeup sponge, add a drop of the pastel colors and dab it onto the middle fingernails.
- Using a fine brush dipped in matte black polish, create the design as shown in the image. You can add color details afterwards if you wish.
- Paint the index fingernails with the matte gray. Then, use the black polish to create the block stripes as shown.
- Use the rainbow glitter polish to create an ombre effect from the top to the bottom on the pinky and thumb fingernails.
- Add the jewels onto the ring fingernails.
13. Rich Matte Chocolate Brown Acrylic Nails
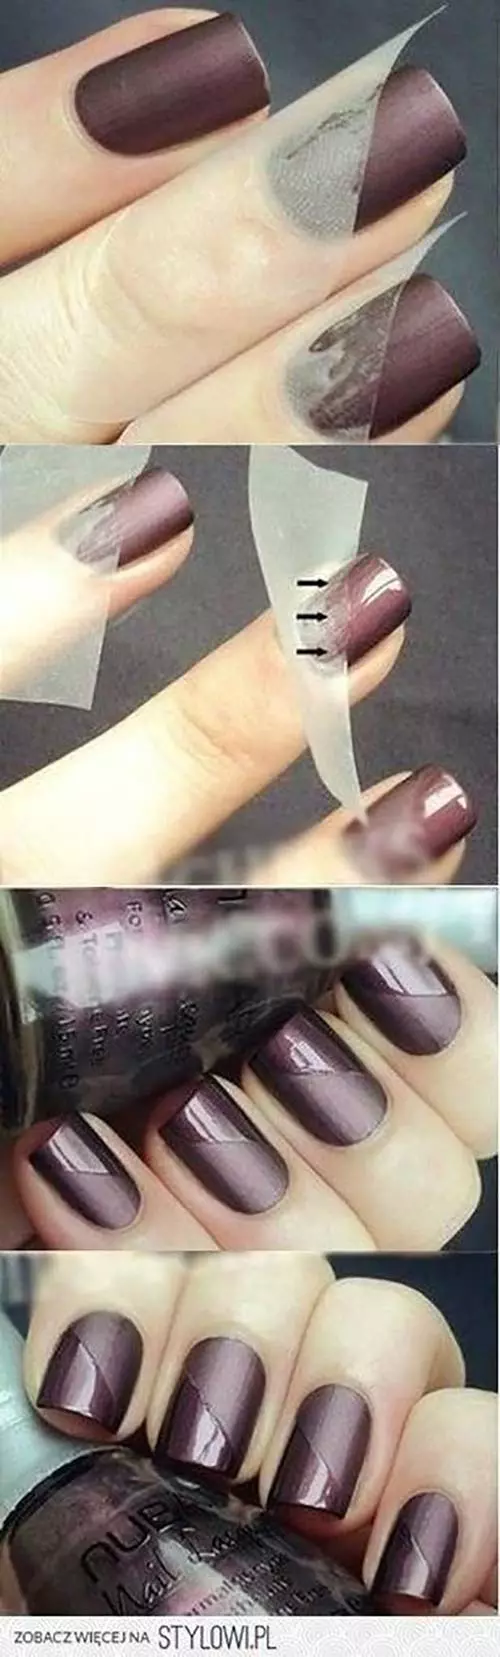
Image:youngcraze.com
Who doesn’t love chocolates, am I right?! Take it one step further and bring your love for chocolate onto your nails! It’s quite simple, but the mix of glossy and matte finish takes the look up another notch.
What You Will Need
- Brown matte nail polish
- Top coat
- Tape
How To Apply?
- Paint all your nails with the brown matte polish.
- Once it’s dry, place the tape diagonally as shown.
- Now, use the top coat to apply over it.
- When you remove the tape, you will clearly see the matte and glossy parts. That’s all!
14. Lavender Boho Acrylic Nails
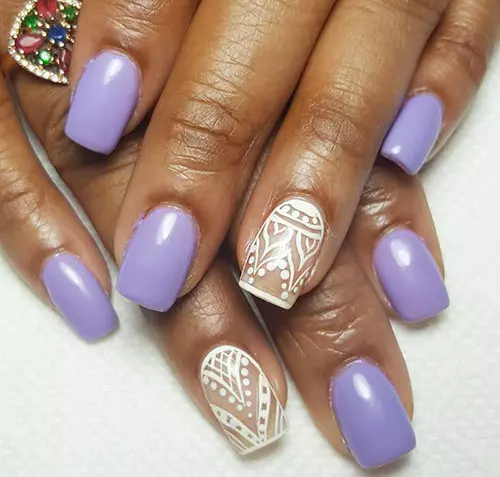
Image:fashionisers.com
Get a chic and boho look with this manicure. It’s so aesthetically pleasing, don’t you agree? The pastel purple with the white mandala design makes for a great combination. Pile on all of your rings and middy rings, and you will have yourself an Instagram-worthy pair of hands. Although I do have to say, you must be able to have steady hands for this one to be able to paint out the design.
What You Will Need
- Pastel purple nail polish
- White nail polish
- Top coat
- Fine brush
How To Apply?
- Leaving the ring fingernail bare, paint all other with the pastel purple shade.
- Use a fine brush dipped in white polish and carefully draw out a boho design.
- Seal the nail art with a top coat.
Black Acrylic Nail Designs
15. Black And White Acrylic Nails With Silver Moons
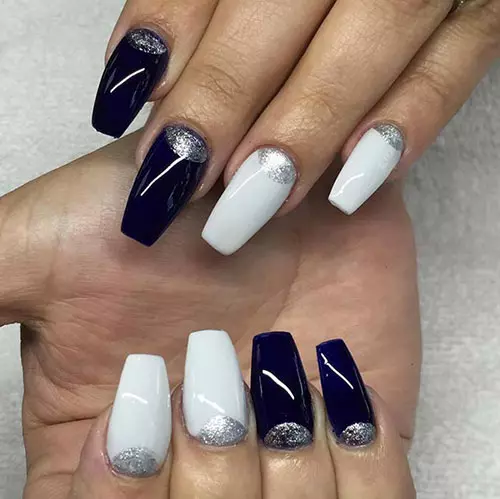
Image:fashionisers.com
If you love monochrome as much as I do, then this one will definitely catch your eye. Black, white and silver; what’s not to love? Not only that, but it’s super easy. I’m pretty sure you, yourself can see how simple it is!
What You Will Need
- Black nail polish
- White nail polish
- Silver nail polish
- Top coat
How To Apply?
- Paint the thumb, pinky and ring fingernails with black.
- Paint the index and middle fingernails white. You can even play around with the colors by reversing the colors on the other hand.
- Paint half-moons with the silver nail polish onto all of the nails.
- Seal the manicure with a top coat.
16. Black And Silver Acrylic Nails
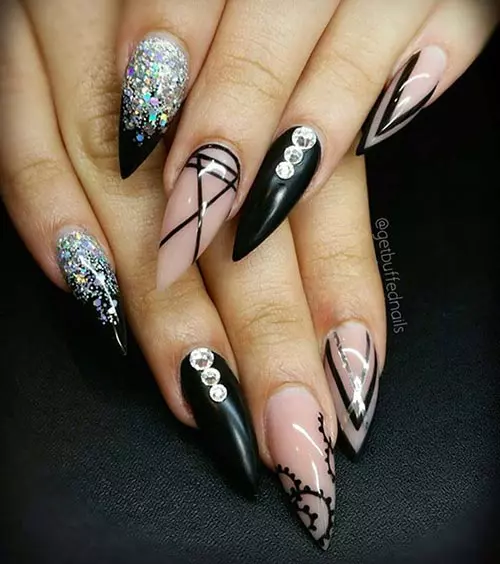
Image:fashionisers.com
Alright! We’re nearing the end of the list which means that the nail art will slowly start getting harder. I love the black and silver glitter combination! This one does look complicated, I will agree. However, with the step by step instructions, it’s not too hard to achieve. Go ahead and try it!
What You Will Need
- Nude nail polish
- Black nail polish
- Silver chunky glitter nail polish
- Rhinestones
- Fine brush
- Top coat
How To Apply?
- Paint the thumb, index and ring fingernails black.
- Paint the middle fingernail and the pinky fingernail nude.
- Use a fine brush dipped in black polish to draw an ‘X’ and two horizontal lines on the middle fingernail. Outline the base near the two lines.
- Draw a chevron pattern near the tip of the pinky fingernail.
- Place rhinestones on the ring fingernail and the thumb.
- Apply the glitter nail polish on the index fingernail in an ombre fashion starting from the base, going upwards to the tip.
- Finish it off with a good top coat.
17. Goth And Glitter Nail Art
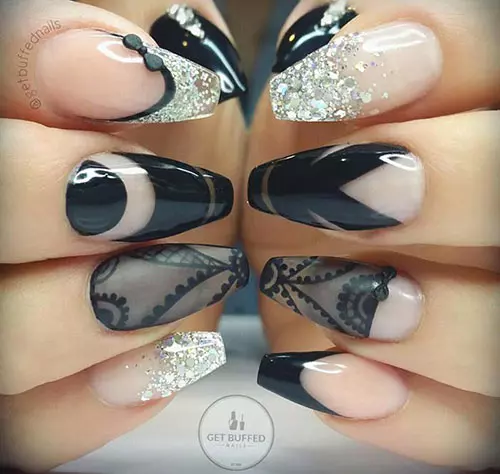
Image:fashionisers.com
It’s only right that this one is last, because as you can see, there’s a lot going on. Who knew glitter and goth themes went together? Well, this manicure certainly proves that they go, not just good, but great together.
What You Will Need
- Black nail polish
- Silver glitter nail polish
- Gray matte polish
- Black matte polish
- Black acrylic bow
How To Apply?
- Let’s take this one nail at a time. The pinky nail is pretty simple. All you have to do is create an ombre effect with the silver glitter at the tip of the nail on one pinky. On the other one, all you need to do is apply the tips with black while making it a slight ‘v’ shape as shown.
- The ring fingernails would probably have to be the most difficult ones. Once on the nail, paint the entire nail gray and then using a fine brush, create intricate lace patterns. On the other nail, leave the first one fourth of the nail near the cuticle and paint the rest of it with the gray polish. Do the same and create the lace pattern on this nail as well. Add the black acrylic bow to this nail.
- Create a semi circle near the cuticle on of the nails. Create a broader outline around the semi-circle as seen on the left middle fingernail. Apply a thin stripe at the tip. Follow a similar pattern on the right fingernail, but this time use an inverted ‘v’ shape.
- Create a French manicure with silver glitter outlined with black. Place another acrylic bow here. On the other nail, create an ombre effect near the tip.
- Paint both the thumb fingernails black. Create a ‘V’ starting from the cuticle, going up.
18. Almond Shaped Aztec Acrylic Nails
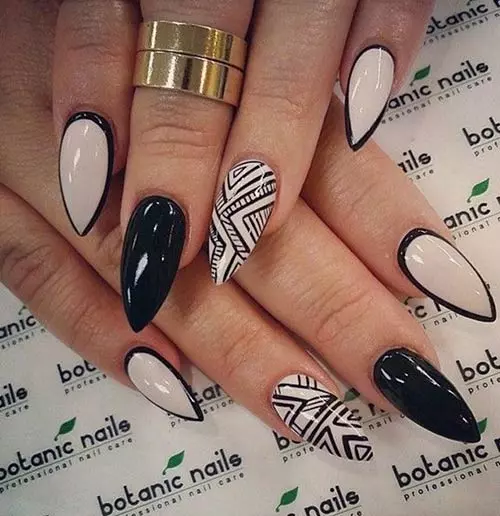
Image:cutediyprojects.com
Love Aztec prints and patterns? Then this is probably something that will pique your interest. If you’re also someone who is just starting to experiment with nail art but doesn’t want to go too overboard, then this is perfect since it’s both minimalist and has a little something extra. Let’s take a look at how to achieve it.
What You Will Need
- Off white nail polish
- Black nail polish
- Fine brush
- Top coat
How To Apply?
- Paint all your nails with the off-white polish except for the middle fingernail.
- Paint the middle fingernail black.
- Use the fine brush to outline the index, thumb and pinky fingernails.
- Once again use the fine brush to create random geometric Aztec patterns on the ring fingernails.
- 5.Finish off the manicure with a top coat to ensure a long lasting manicure.
White Acrylic Nail Designs
19. White Acrylic Nails With A Marbled effect
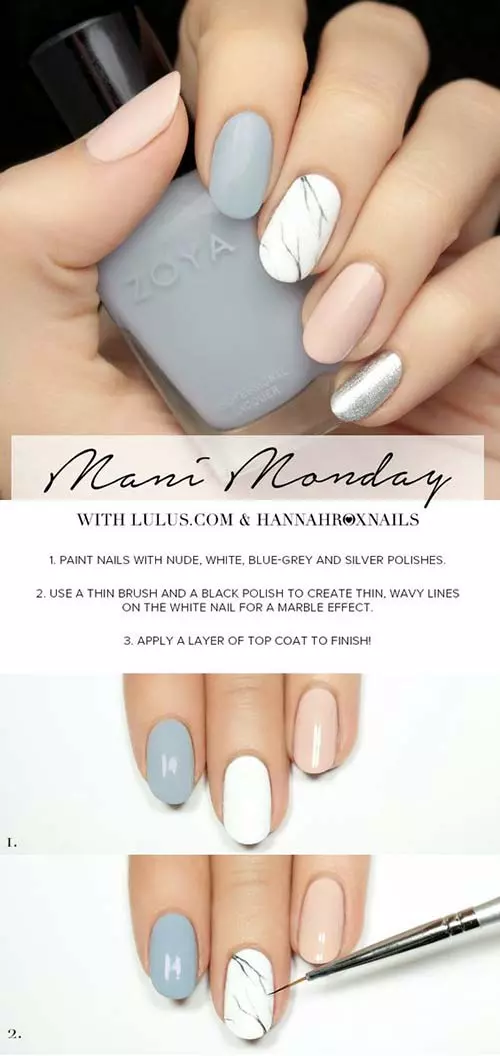
Image:lulus.com
I’m sure you’ve noticed all the trends on Instagram about marbled nails and phone cases. It looks classy as hell, and the best part is, it’s quite easy to pull off. This is a great choice for both beginners and pros alike.
You Will Need
- Nude nail polish
- White nail polish
- Blue-gray nail polish
- Silver nail polish
- Black nail polish
- A fine brush
- Top coat
How To Apply?
- Paint the thumb and ring finger with nude.
- Paint the middle finger white.
- Paint the index finger with the blue-gray shade.
- Paint the pinky finger with the silver nail polish.
- Then, using the fine brush dipped in black polish, create fine lines as shown to achieve a marbled effect.
- Seal it all up with a good quality top coat to make sure that the manicure lasts for a long time.
20. Chevon Acrylic Nail Art
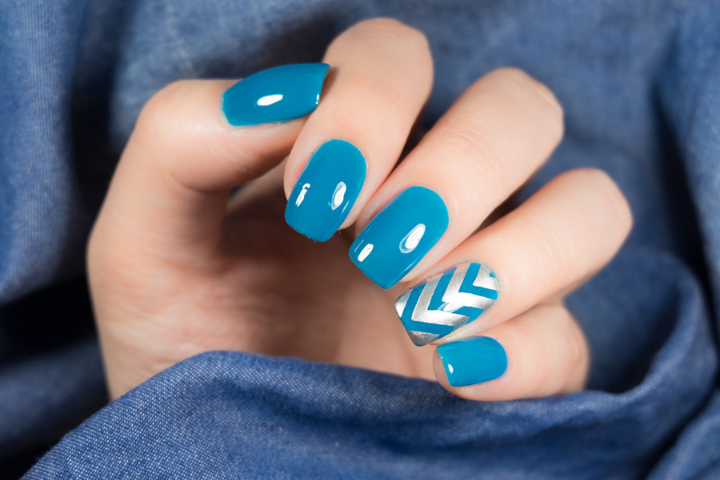
Image: Shutterstock
This one is for all you minimalists out there. Chevrons are all the rage these days. They’re super chic and look classy. You can achieve this look with just two or three things. It will take you five minutes!
What You Will Need
- A nail polish in any shade for the base coat
- A nail polish in a complementary shade for a chevron pattern
- Thin striping tape
- Top coat
How To Apply?
- Paint an even layer of base coat with your nail polish and let it dry.
- Place pieces of striping tape over your nails in successive V-shapes to create your chevron pattern stencil.
- Paint over the tape stencil with your complementary nail polish shade and wait a minute to ensure the paint is not runny.
- Carefully remove the tape with tweezers and let the pattern dry completely.
- Seal it off with a top coat.
21. White Flower Accent Nail
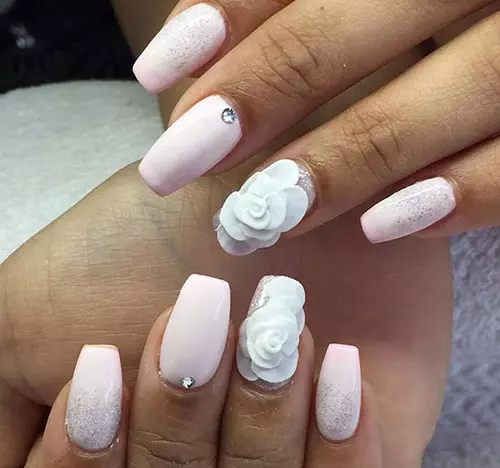
Image:fashionisers.com
You are probably wondering why there are so many pastel shades in this list of acrylic nail art designs . Well, that’s because pastel shades are what’s in these days. Everywhere you go, you see them. They exude a very minimalist appeal which is what the millennials prefer.
What You Will Need
- Pastel pink nail polish
- White acrylic flower
- Silver micro glitter nail polish
- Nail jewels
How To Apply?
- Paint all your nails with the pastel pink polish as the base.
- Create an ombre effect with the silver glitter polish on the index and pinky fingernails.
- Apply a layer of the glitter polish all over the ring fingernail.
- Place the acrylic flower over the ring fingernail.
- Apply the jewel at the bottom of the middle fingernails.
Pink Acrylic Nail Designs
22. Pink Acrylic Nails With Gold Geometric Patterns
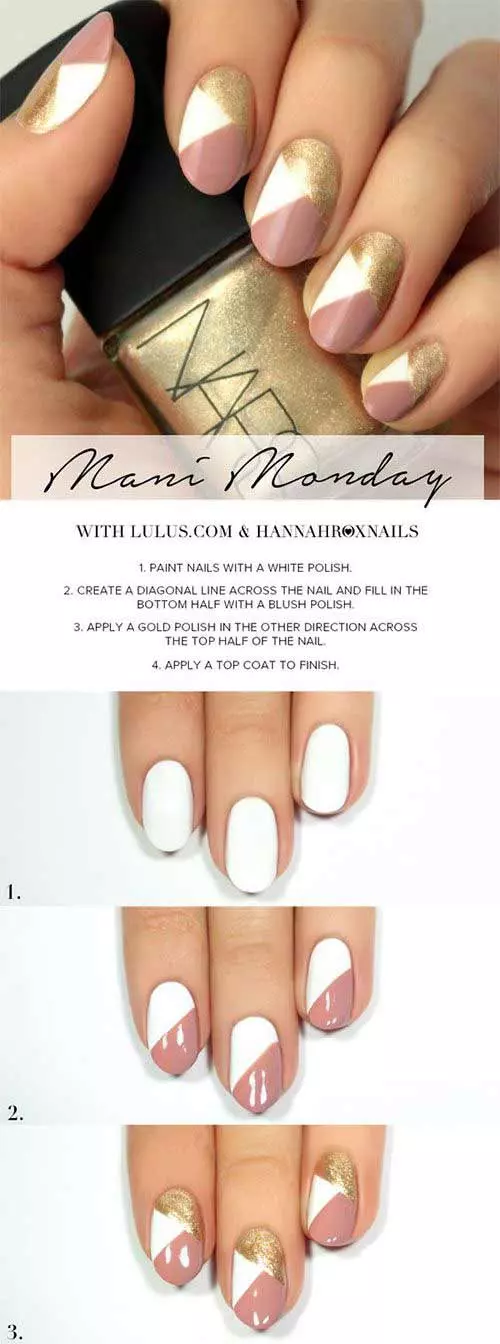
Image:fabnailartdesigns.com
This nail art is ideal for a beginner. Don’t worry, even if you’re a pro and you want to take it easy and create a simple nail art, you can totally do this too! It’s super simple, and you wouldn’t need any tools. When you combine three colors this way, it looks like you spent a good deal of time and it’s super aesthetically pleasing!
What You Will Need
- White nail polish
- Blush/Peach nail polish
- Gold nail polish
How To Apply?
- Paint all your nails in white. This will be the base.
- Now, create a diagonal stripe with the blush colored nail polish.
- Use the gold to create another, smaller diagonal stripe near the cuticle as shown.
- Lastly, top it off with a top coat for a long-lasting manicure.
23. Pastel Pink Princess
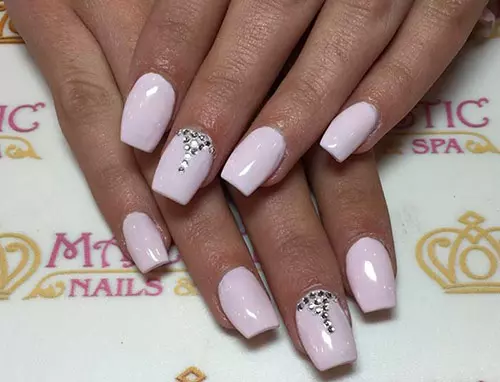
Image:fashionisers.com
This one is perfect for those of you that have a party or occasion to attend on short notice, or if you’re running late. It requires little effort, and by the end of it, it will look as though you’ve spent some time at the nail bar getting it done.
What You Will Need
- Pastel pink nail polish
- Stick on Nail jewels
- Top coat
- Tweezers
How To Apply?
- Use the pastel pink shade as the base for all of your nails.
- Using a tweezer, place six nail jewels near the cuticle of your middle fingernail.
- Now, place three more jewels above the six jewels
- Place two more above the three jewels.
- Finally, place three of them, but this time one above the other as shown in the image.
- Finish the nail art by adding a top coat.
24. Pink Acrylic Nails With Gold Foil
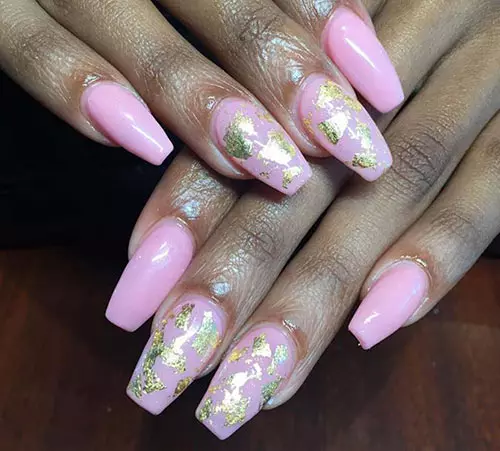
Image:fashionisers.com
This is another super quick one. It will literally take you less than five minutes; that’s how easy it is. The plain pastel pink by itself looks wonderful. Now, you add those flecks of golden foil all over the nail and it resembles a gold-flecked stone!
What You Will Need
- Pastel pink nail polish
- Gold foil
- Top coat
How To Apply?
- Use the pastel pink nail polish to paint all of your nails. This will be the base.
- Now, apply the golden foil randomly over your middle fingernail and ring fingernail.
- Once you are happy with the look, seal it off with a top coat for a long-lasting effect.
25. Cute Acrylic Nails In Pink
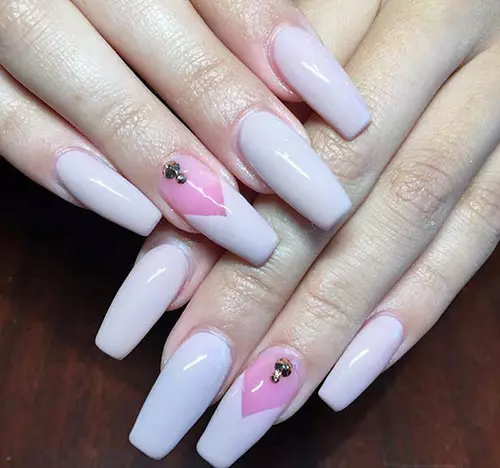
Image:fashionisers.com
Simple and pretty. That’s the best way I would describe this nail art. This is for all you lovers of pink out there. The nail art in question is a play on two shades of pink. It would’ve been a plain nail art, had it not been for the accent nail and the jewel on it. Let’s look at how to achieve this!
What You Will Need
- Very pale pink nail polish (it should almost look white)
- Light pink nail polish
- Silver nail jewels
- Top coat
How To Apply?
- Leaving the ring fingernail, paint all the nails with the pale pink nail polish.
- Paint the ring fingernails with the light pink polish.
- Create a ‘v’ shape at the center of the ring fingernail and paint it till the tip.
- Place one big jewel and a small jewel consecutively above it to finish the look.
- Seal it with a top coat.
26. Pastel Pink Acrylic Nails
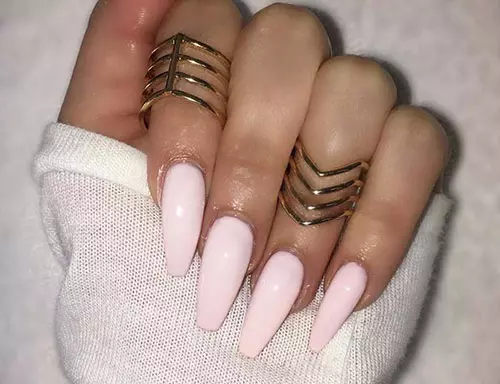
Image:fashionisers.com
I know we’ve all heard the saying that goes “Simplicity is the ultimate sophistication”, and it holds true for many aspects. Leonardo Da Vinci knew what he meant when he said that and even today, his words remain relevant. This manicure is simple, but that is chic and sophisticated. There’s not much to this manicure, but that’s the beauty of it!
What You Will Need
- Pastel pink nail polish
- Top coat
How To Apply?
- Paint all your nails with the pastel pink shade.
- Seal it with a top coat.
27. Pink And Blue Ombre With Hearts
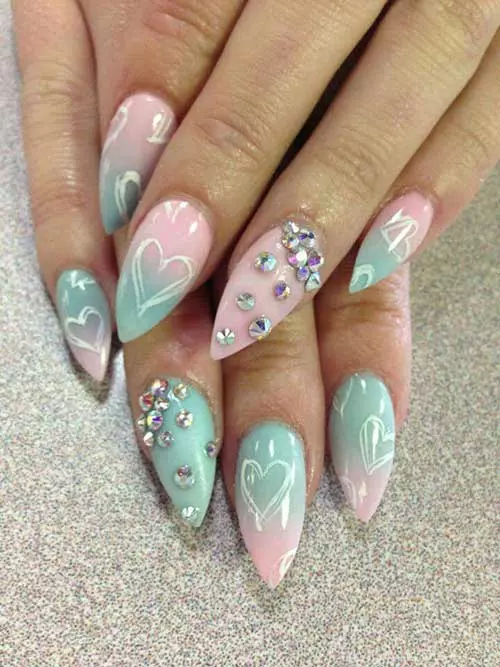
Image:cutediyprojects.com
How cute is this?! Honestly, an ombre effect is so useful for taking your whole manicure game up a notch. You have to put in very little effort since the makeup sponge will be doing all the work. Now, add a few hearts and some rhinestones, and you’ve got yourself a pretty cool manicure!
What You Will Need
- Pastel pink nail polish
- Pastel blue nail polish
- Fine brush
- White nail polish
- Nail jewels
How To Apply?
- On a makeup sponge, apply the pink and blue nail polishes next to each other.
- Dab the sponge onto all the nails till you can see an ombre effect.
- Use the fine brush to create sketch-style rough hearts on all nails except for the ring fingernails.
- Add the nail jewels to the ring fingernail.
French Acrylic Nails
28. French Acrylic Nails With An Ombre
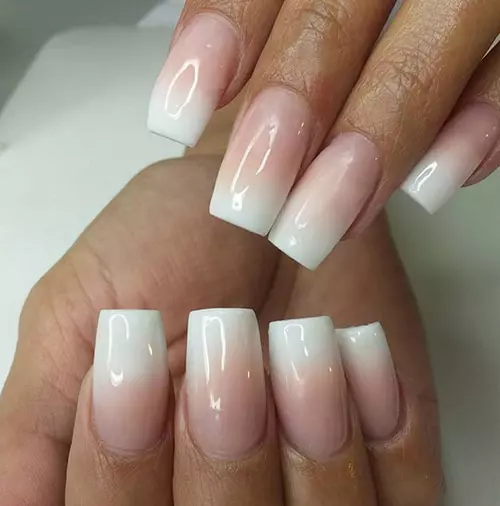
Image:fashionisers.com
Here’s another favorite for those of you who love keeping things minimalistic. It’s kind of a French manicure, except that instead of a clear-cut distinction between the tip and the nail bed, it’s applied in an ombre fashion. It’s extremely easy to apply. Let’s check it out!
What You Will Need
- Nude nail polish
- White nail polish
- Makeup sponge
- Nail polish remover
- Top coat
How To Apply?
- On a makeup sponge, apply 2 stripes of nude polish and one strip of white polish.
- Make sure that the white nail polish on the sponge will go over the tip of the nail. Dab it onto each nail till you achieve the desired effect. Reapply the polish on the sponge as per your requirement.
- Clean up the skin around the nail with nail polish remover.
- Seal it all off with a top coat.
29. Floral Accent French Tips
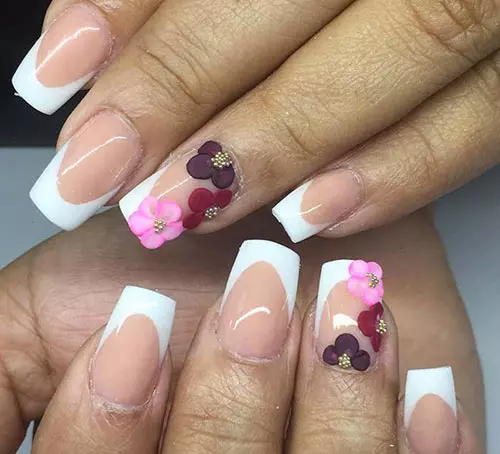
Image:fashionisers.com
This is another one of those that look super fancy, and will trick people into thinking that you’ve had a recent trip to the salon, but in fact took you literally five minutes to achieve if you’re good at a French manicure. The addition of the acrylic flowers takes it from simple to dressy!
What You Will Need
- White nail polish
- Acrylic flowers
- Top coat
How To Apply?
- Apply a French manicure according to the shape of your nails.
- Apply the top coat.
- Place the acrylic flowers carefully onto the ring fingernails for an accent nail look.
30. Black French Tips With Silver Accent Nail
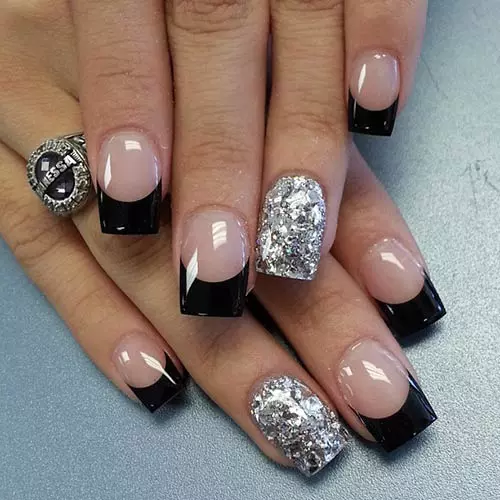
Image:cutediyprojects.com
I personally love this one! A French manicure with black instead of white and a silver accent nail; that’s my kind of manicure right there. It’s so simple, but the colors together make this nail art stand out and looks chic.
What You Will Need
- Black nail polish
- Silver nail polish
- Top coat
How To Apply?
- Apply a French manicure with the black polish at the tips on all nails except the ring fingernail.
- Apply the silver glitter nail polish on the ring fingernail.
- Finish the manicure with a top coat for long lasting results.
Glitter Acrylic Nail Designs
31. Silver Glitter Acrylic Nails With Beige
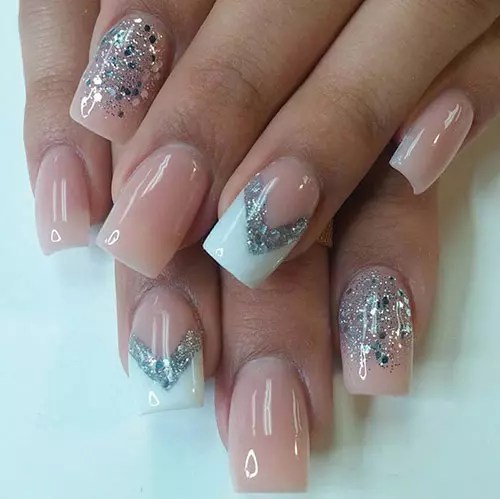
Image:fashionisers.com
This one is super cute! It’s perfect for special occasions such as weddings. The colors used in this nail art are quite versatile in the sense that they’d go with almost any outfit. The silver glitter adds a little something extra to the whole nail art!
What You Will Need
- Nude nail polish
- White nail polish
- Silver glitter nail polish
- Top coat
- Tape
How To Apply?
- What you will need to do first, is to paint all your nails with the nude shade as the base.
- Use the glitter polish to paint your index fingernails, leaving the tips plain. Try and use a light hand as you reach the top to achieve an ombre effect.
- Use tape on the top and bottom of the ring fingernail to get a ‘V’ shape.
- Paint it with the silver glitter nail polish.
- Carefully remove the tape and follow the ‘V’ shape near the tips to paint it white as shown in the image.
- Finish the manicure with a top coat for long lasting results!
32. Blue Glitter Ombre Tips
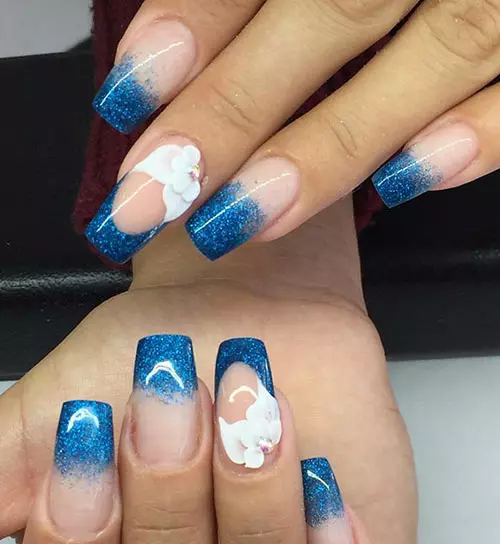
Image:fashionisers.com
Here’s a fun twist to the French manicure. Ditch the plain white tips for a blue glitter ombre! When I first saw this manicure, it reminded me of the Little Mermaid! The blue glitter resembles the ocean and her tail, whereas the flower reminded me of the flower she wears in her hair later in the movie!
What You Will Need
- Blue glitter nail polish
- White acrylic flower
- Top coat
- Makeup sponge
How To Apply?
- Apply the glitter polish on a makeup sponge and dab it onto the tips of your nails for an ombre effect. Leave the ring fingernail bare. This will be the accent nail.
- For the ring fingernail, apply a French manicure with the glitter polish.
- Seal the manicure with a top coat.
- Add the acrylic flower on the ring fingernail. Your manicure is complete! You’re good to go!
33. Pink And Silver Glitter
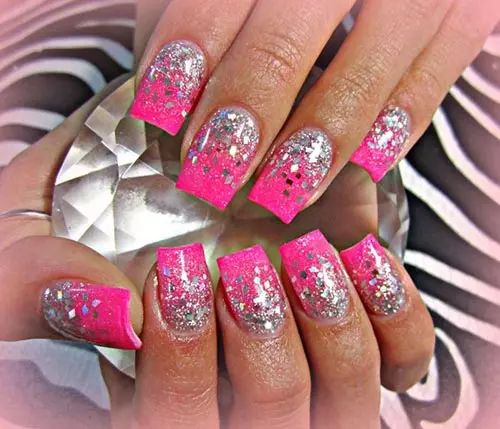
Image:cutediyprojects.com
If you liked how super quick and simple the last one was, then you’ll like this one as well. If the previous one was a more minimalist approach to nail art, then this one is for those of you who like to spice things up a little and make your manicure look glam.
What You Will Need
- Hot pink nail polish
- Silver chunky glitter nail polish
- Top coat
How To Apply?
- Paint all of your nails with the hot pink polish.
- Starting from the bottom to the tip, create an ombre effect with the silver glitter nail polish
- Apply the top coat for a long-lasting manicure.
34. Peach And Glitter Acrylic Nails
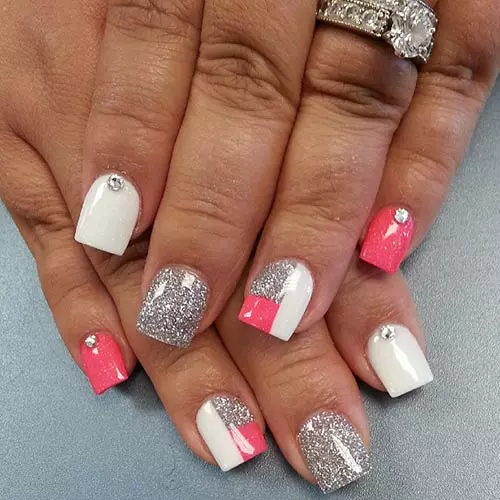
Image:cutediyprojects.com
This one is a cute and fun manicure that works with color combinations and geometric shapes. You can play around with the shades. If you’re not a fan of bright colors, all you need to do is replace the salmon shade with black and make it a monochrome look. It would look amazing!
What You Will Need
- Salmon nail polish with micro glitter
- White nail polish
- Silver glitter nail polish
- Tape
- Rhinestones
- Top coat
How To Apply?
- Paint the index fingernail white.
- Paint the middle fingernail with the silver glitter polish.
- Paint the pinky and thumb fingernails with the salmon nail polish.
- Tape half of the ring fingernail and paint over it with white.
- Tape the top half of the nail and the area over the white after it has dried. Paint over it with the silver.
- Carefully paint the remaining area with the salmon shade. Use tape for this if you must as well.
- Add a rhinestone to the index and pinky fingernails.
- Finish the manicure with a topcoat.
35. Rose Gold Glitter Nails
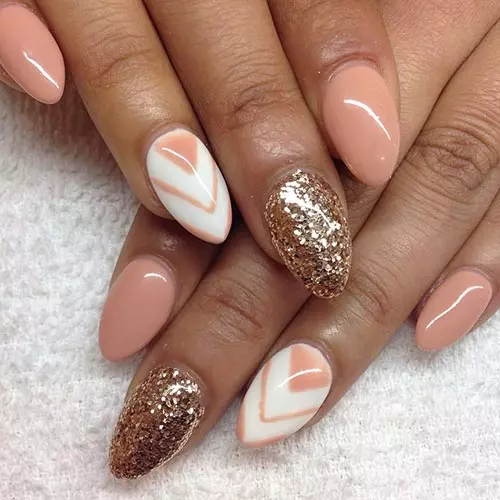
Image:cutediyprojects.com
The color combination in this one is absolutely stunning. It’s the true Instagram aesthetic. If you consider yourself to be a social person who loves posting all things trending, then trust me, you’ll want a picture of this manicure in your profile.
What You Will Need
- Dusty pink nail polish
- White nail polish
- Rose gold nail polish
- Fine brush
- Top Coat
How To Apply?
- Use the dusty pink for the thumb, index and pinky fingernails.
- Paint the ring fingernail white and use a fine brush to create the pattern as shown.
- Paint the middle fingernail with the rose gold glitter polish.
- Finish the look with a top coat.
36. Glitter Acrylic Nails With Geometric Patterns
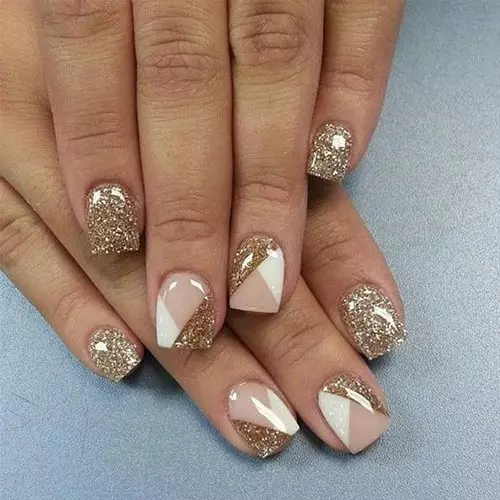
Image:cutediyprojects.com
Sophisticated and neutral, this one is for the simple and bold people alike. This is probably one of my favorite color combinations of all time. The nude, white and gold work so well together! The geometric shapes look difficult to achieve, but with the help of some tape, it’s pretty easy!
What You Will Need
- Gold glitter nail polish
- Nude nail polish
- White nail polish
- Tape
- Top coat
How To Apply?
- Paint the index, pinky and thumb fingernails in gold.
- Use some tape to apply it diagonally on the ring finger. Same goes for the middle fingernail. Paint over it with gold. Make sure to use different angles and shapes for both the nails.
- Repeat the step and this time paint over it with the white. Do it again for the nude polish.
- Finish the look with a layer of the top coat.
37. Glitter And Rhinestone Almond Nails
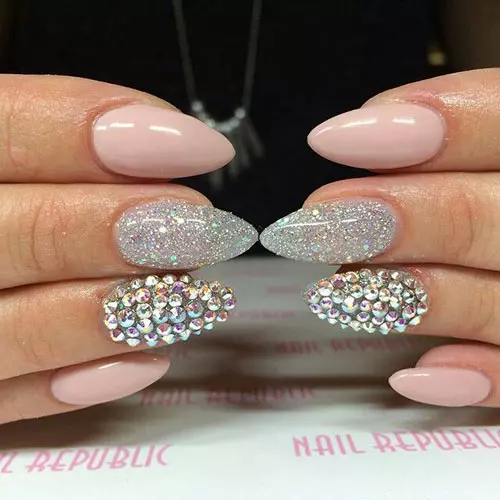
Image:cutediyprojects.com
Calling all of you bling lovers! Need something more ostentatious? This rhinestone-bedazzled accent nail and glitter nail art is great because all that glitter and sparkle is easily balanced with the subtle peachy nude shade.
What You Will Need
- Peachy nude nail polish
- Rhinestones
- Silver glitter nail polish
How To Apply?
- Paint the thumb, index, and pinky with the peachy nude shade.
- Paint the middle fingernail with the silver glitter polish
- Apply the rhinestones on the ring fingernail as the accent to make it stand out.
38. Red White And Blue Glitter
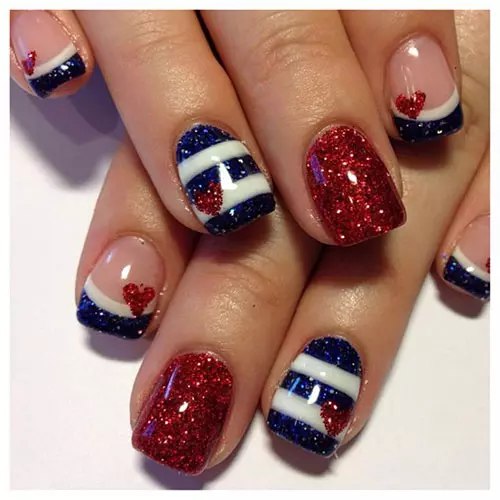
Image:cutediyprojects.com
Fan of the sparkles and glitter? You’d love this one then. Red white and blue is a classic color combination. It could be patriotic if you want, or just a simple color combination. Either way, this is a super cute and easy nail art to achieve.
What You Will Need
- Red glitter nail polish
- Blue glitter nail polish
- White nail polish
- Fine brush
- Top coat
How To Apply?
- Paint the middle and thumb fingernails with the red glitter nail polish.
- Paint the ring fingernails with the blue glitter polish. Add two stripes and a heart as shown.
- Apply the blue glitter as a French manicure for the index and pinky fingernails. Add a stripe under the tip and a heart.
- Finish off with a top coat.
39. Navy Blue And Gold Royalty
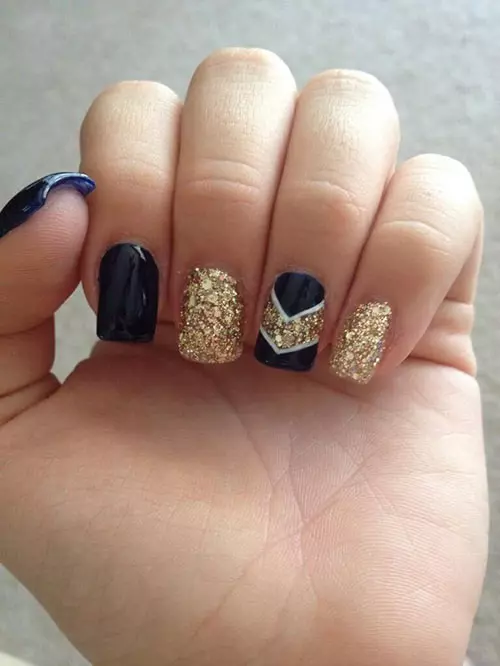
Image:cutediyprojects.com
This is one of my personal favorites! I am completely in love with the navy blue and gold combination. I don’t know about you, but this totally reminds me of a magical dress made by someone like Zuhair Murad! I wouldn’t mind that on my nails!
What You Will Need
- Navy blue up nail polish
- Gold glitter nail polish
- White nail polish
- Fine brush
- Tape
- Top coat
How To Apply?
- Paint the thumb, index and the fingernails in the navy blue nail polish.
- Paint the middle and pinky fingernails in the gold glitter polish.
- Apply strips of tape on the ring finger to form a thick ‘v’. Paint over it with gold.
- Remove the tape pieces and you will see the shape of the ‘v’.
- Outline the gold part with a fine brush dipped in white polish.
- Seal the manicure with a top coat.
40. Criss Cross Acrylic Nail Art
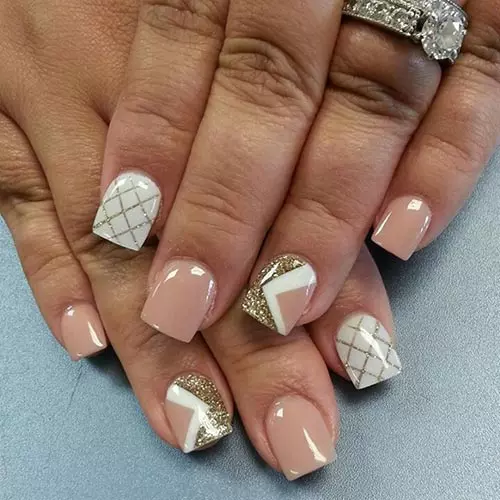
Image:cutediyprojects.com
If you like keeping the shades you use on the down low but want to experiment with the pattern, then this one is a must try. I honestly am feeling the gold, white and dusty pink combination. Plus, those shapes take the manicure up another level!
What You Will Need
- White nail polish
- Gold glitter nail polish
- Dusty pink nail polish
- Top coat
- Tape
How To Apply?
- Paint the thumb, middle and pinky fingernails with the dusty pink shade.
- Paint the index and ring fingernails with the gold glitter nail polish shade.
- Place very thin strips of tape in a crisscross manner on the index fingernails, and paint over it with white.
- Create a wide ‘v’ shape on the ring fingernails with tape. Apply white polish over it.
- Wait for it to dry and repeat the step creating a smaller ‘v’ within the white part. Apply the dusty pink polish over it.
- Seal it with a top coat.
Blue Acrylic Nail Designs
41. Mermaid Scales
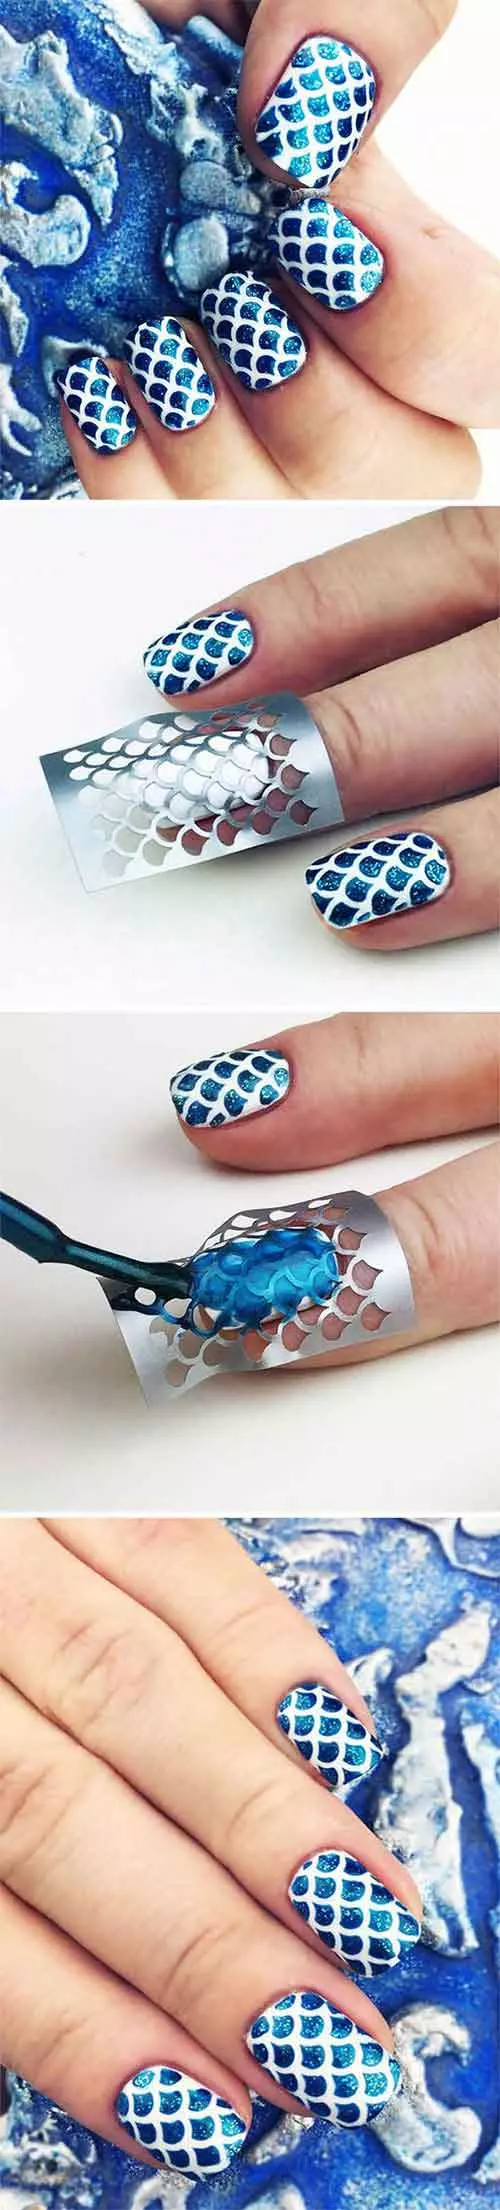
Image:fabnailartdesigns.com
Do feel like the ocean is your calling? Or, do you love mythical creatures? Then, this nail art is something you should check out. Plus, it just looks really cool. With the help of a stencil, you can achieve that salon-like perfection!
What You Will Need
- Metallic blue nail polish
- White nail polish
- Nail stencil or sticker that looks like mermaid or fish scales
- Top coat
How To Apply?
- Paint all your nails white as the base.
- Wait till the polish is dry. Then, place the stencil over your nail.
- Paint over it with the metallic blue nail polish.
- Wait about 30 seconds before removing the stencil.
- Seal the nail art with a top coat.
42. Blue Acrylic Nails With Flowers
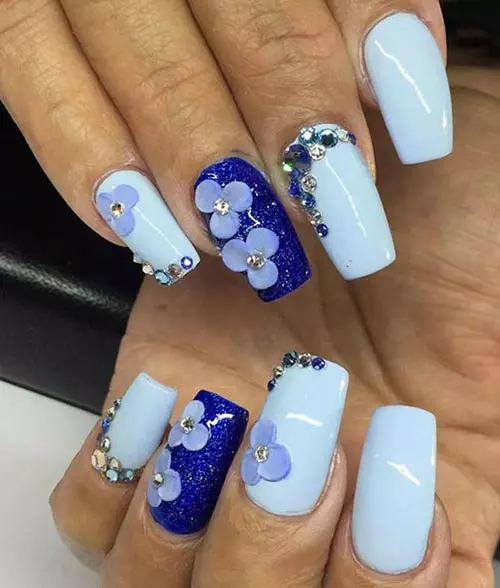
Image:fashionisers.com
Another amazing nail art involving acrylic flowers. It’s a cute and fun look for the spring and summer when the flowers are full in bloom! It may look complicated, but that’s the best part! It’s so easy to achieve this look! Let’s look at the stuff that you’ll need.
What You Will Need
- Pastel blue nail polish
- Blue glitter nail polish
- Blue acrylic flowers
- Nail jewels
How To Apply?
- Paint all your nails except the ring fingernail with the pastel blue shade.
- Paint the ring fingernail with the blue glitter nail polish.
- Apply the acrylic flowers on the accent nail and one other nail of your choice.
- Apply the jewels to your nails. Try and use different colors of blue for an added effect.
3D Acrylic Nail Art Designs
43. Bow Accent Acrylic Nails
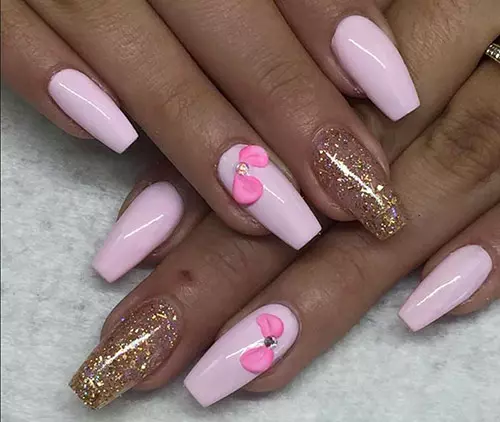
Image:fashionisers.com
These nails totally remind me of Hello Kitty! Growing up, I had so much of Hello Kitty merchandise! Even today I can’t help but stare in awe of how cute their stuff is! If you want an adorable, yet glam look, then this one is for you!
What You Will Need
- Gold glitter nail polish
- Pastel pink nail polish
- Acrylic bow
How To Apply?
- Paint all nails except the middle nail with the pastel pink nail polish.
- Stick on the acrylic bow on the ring fingernail while the nail polish is still wet.
- Paint the middle fingernail with gold.
44. 3D Acrylic Nail Art With Flowers
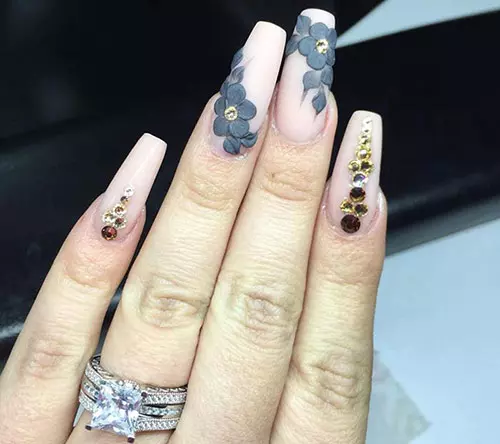
Image:fashionisers.com
Another great one for someone who likes dressing their nails up. It’s also great for weddings. The intricate gray floral pattern goes well with the nude base of the nails. The flowers itself have been crafted with acrylic material. You can easily purchase pre-made flowers in the market.
What You Will Need
- Nude nail polish
- Gray acrylic flowers
- Nail art jewels
How To Apply?
- First, you will need to paint all your nails with the nude nail polish.
- Then, you can either create the acrylic flowers from scratch, or apply the premade ones onto the middle and ring fingernails.
- Play around with the combination of the colors of the jewels and apply them accordingly on thumb, pinky and index fingernails.
45. Rhinestone Accent Nails
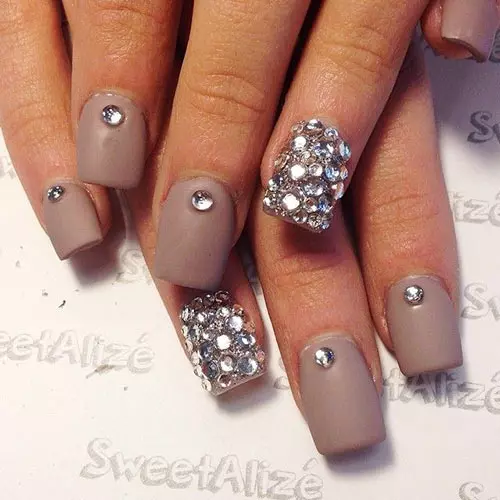
Image:cutediyprojects.com
For all you that are obsessed with anything sparkly, this one is truly your calling. There’s nothing about the brown shade that makes the manicure stand out. However, add a rhinestone on each nail and an entire nail bedazzled, and we have ourselves a-whole-nother story altogether!
What You Will Need
- Matte brown nail polish
- Rhinestones
How To Apply?
- Start off by painting all your nails with the matte brown nail polish.
- While the polish is still wet, add a rhinestone to every nail.
- Add as many rhinestones as you can on the ring fingernail in order to highlight it as the accent nail.
46. Chunky Rhinestones With Pink Nails
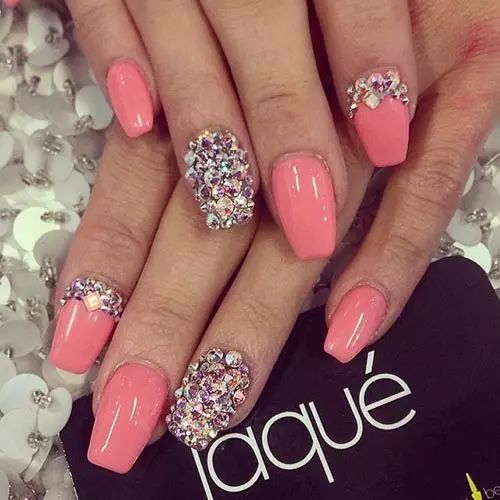
Image:cutediyprojects.com
This is one of those looks which isn’t exactly for the ones who are looking for something simple. Looking to take your nail art creativity game to the next level? Then you’ve come to the right manicure because this will definitely stand out. However, this is also appropriate for your wedding day if you’re looking to make a statement!
What You Will Need
- Salmon nail polish
- Rhinestones
How To Apply?
- Leaving the ring fingernail, paint the rest of the fingernail with the salmon shade.
- Apply rhinestones of different sizes onto the ring fingernail. Various colors of light pinks and whites would look the best.
- Also, add some of the rhinestones onto the index fingernail.
Valentines Acrylic Nail Designs
47. Heart Acrylic Nails With Red Tips
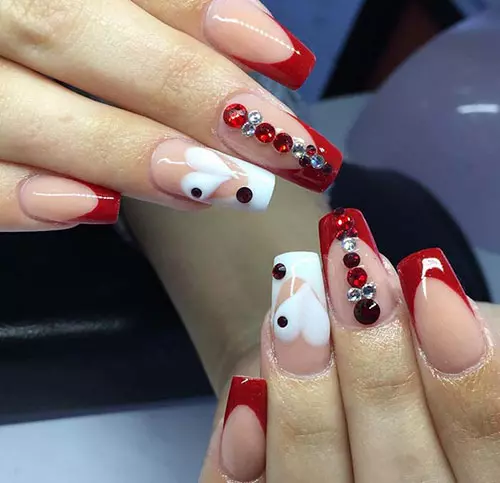
Image:fashionisers.com
If Valentine’s Day is coming up and you’re looking for a cute nail art manicure that will stand out, then try this one! It has all the colors of the ‘Day of Love’. The addition of the red and white embellishments makes it look super fancy!
What You Will Need
- Red nail polish
- White nail polish
- Red and white nail jewels
- Dotting tool
- Fine brush
- Top coat
How To Apply?
- Apply the red nail polish to the tips in a ‘v’ shape. Leave the ring fingernail bare.
- Do the same on the ring fingernail with the white nail polish.
- Create two dots next to each other with the dotting tool dipped in white nail polish and use the fine brush to create the bottom of the heart.
- Apply the jewels tastefully as shown on the middle fingernails and the accent nail.
- Seal the manicure with a top coat.
48. Valentines Acrylic Nails With Love Letters
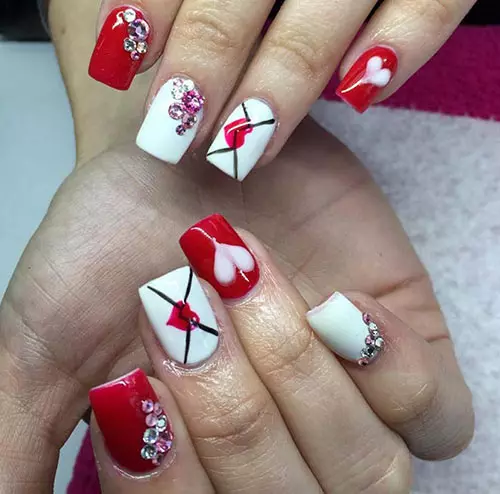
Image:fashionisers.com
Another artistic manicure for the big V-Day, involving love letters! Before the age of texting, it was all about handwritten love notes. Sometimes even today, a lot of people like sending love letters for the sentiment!
What You Will Need
- Red nail polish
- White nail polish
- Nail jewels
- Black nail polish
- Fine brush
- Dotting tool
- Top coat
How To Apply?
- Apply the red polish on the index, thumb and pinky fingernails, while painting the middle and ring fingernails white.
- Use the fine brush to create a letter on the middle fingernail. Add a heart to the opening.
- Create a heart with the help of a dotting tool and the fine brush on the pinky.
- Place the nail jewels on the rest of the nails.
- Finish the manicure with a top coat.
Gold Acrylic Nail Designs
49. Golden Foil Acrylic Nail Tips
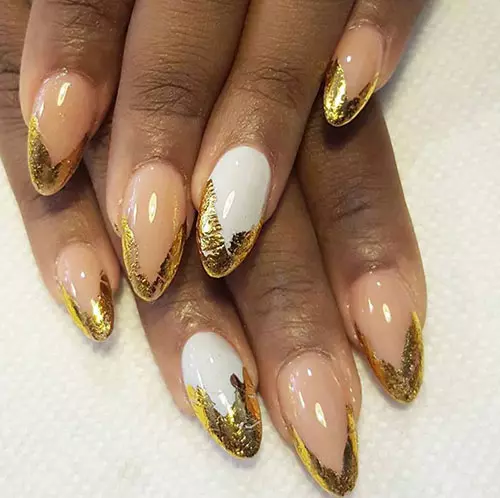
Image:fashionisers.com
If you are a fan of gold, then this is something that you should give a shot. It’s one of those nail arts that look like you’ve put in a lot of time and effort, but in fact, this style is super quick and easy to achieve, so let’s look at all the stuff that you will need, shall we?
What You Will Need
- Gold Foil
- White nail polish
- Nude nail polish
- Top coat
How To Apply?
- Paint all nails except the ring fingernail with the nude nail polish.
- Paint the ring fingernail with white.
- Carefully place the foil along the tips of the nails. Follow the ‘v’ shape.
- Seal it with a top coat.
50. All That Glitters Is Gold
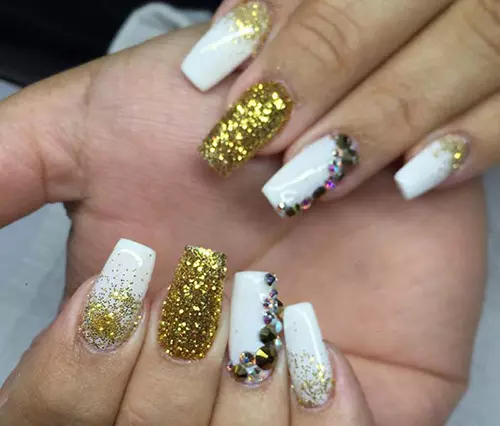
Image:fashionisers.com
Are the other nail arts too dull and boring for you? Okay, hold onto your hats and wigs because this one is for the bold hearted. If you like standing out and making an impression with strong statements and appearances, this manicure is worth your time.
What You Will Need
- White nail polish
- Gold glitter nail polish
- Nail jewels
- Makeup sponge
- Top coat
How To Apply?
- Leaving the middle fingernail bare, paint all the nails in white.
- Create an ombre effect with the gold glitter on the thumb, index fingernail and the pinky fingernail.
- Apply the gold polish on a makeup sponge and dab it onto the middle finger nail. This will give the nail a very saturated look.
- Apply the nail jewels along one side of the ring fingernail.
- Finish the look by applying a top coat. There you go! All done!
51. Cow Nail Art
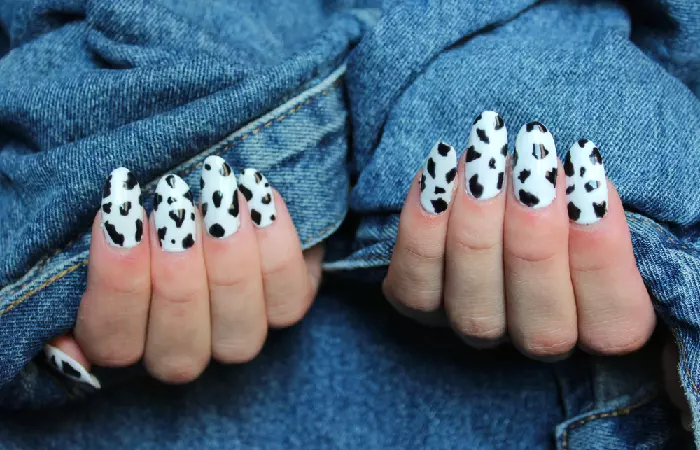
Shutterstock
Are you an animal lover? Considering how popular cow prints have become in the fashion industry, from fabrics to hair accessories, why not try this nail art design? Opt for this adorable cow print nail art to express your love for all animals.
What You Will Need
- White nail polish
- Black nail polish
- Silver nail polish
- Toothpick or dotting tool
- Top Coat
How To Apply?
- Apply a base coat using the white nail polish.
- Add in a few small dots on the white base using the black and silver polishes.
- Use the dotting tool or toothpick, make the dots more patch-like with defined shapes.
- Do one nail at a time to prevent the drying up of the nail polish.
- Finish off with a transparent top coat.
You can try making the patch with other colors like brown or maroon instead of black. Or use sparkle nail paint to make the patches stand out even more.
Key Takeaways
- Acrylic nails can enhance the appearance of your natural nails, making them look bigger and in good shape
- They are made from a liquid monomer and powder polymer, a good option for people whose nails are brittle and take a lot of time to grow.
- Acrylic nails are a great way to express your personality and reveal your unique style.
- There is a wide variety of acrylic nail designs available to suit various preferences and occasions, from bold and extravagant designs to simple, and elegant designs.
- These cute and strong nails last for 3-4 weeks with proper care and caution.
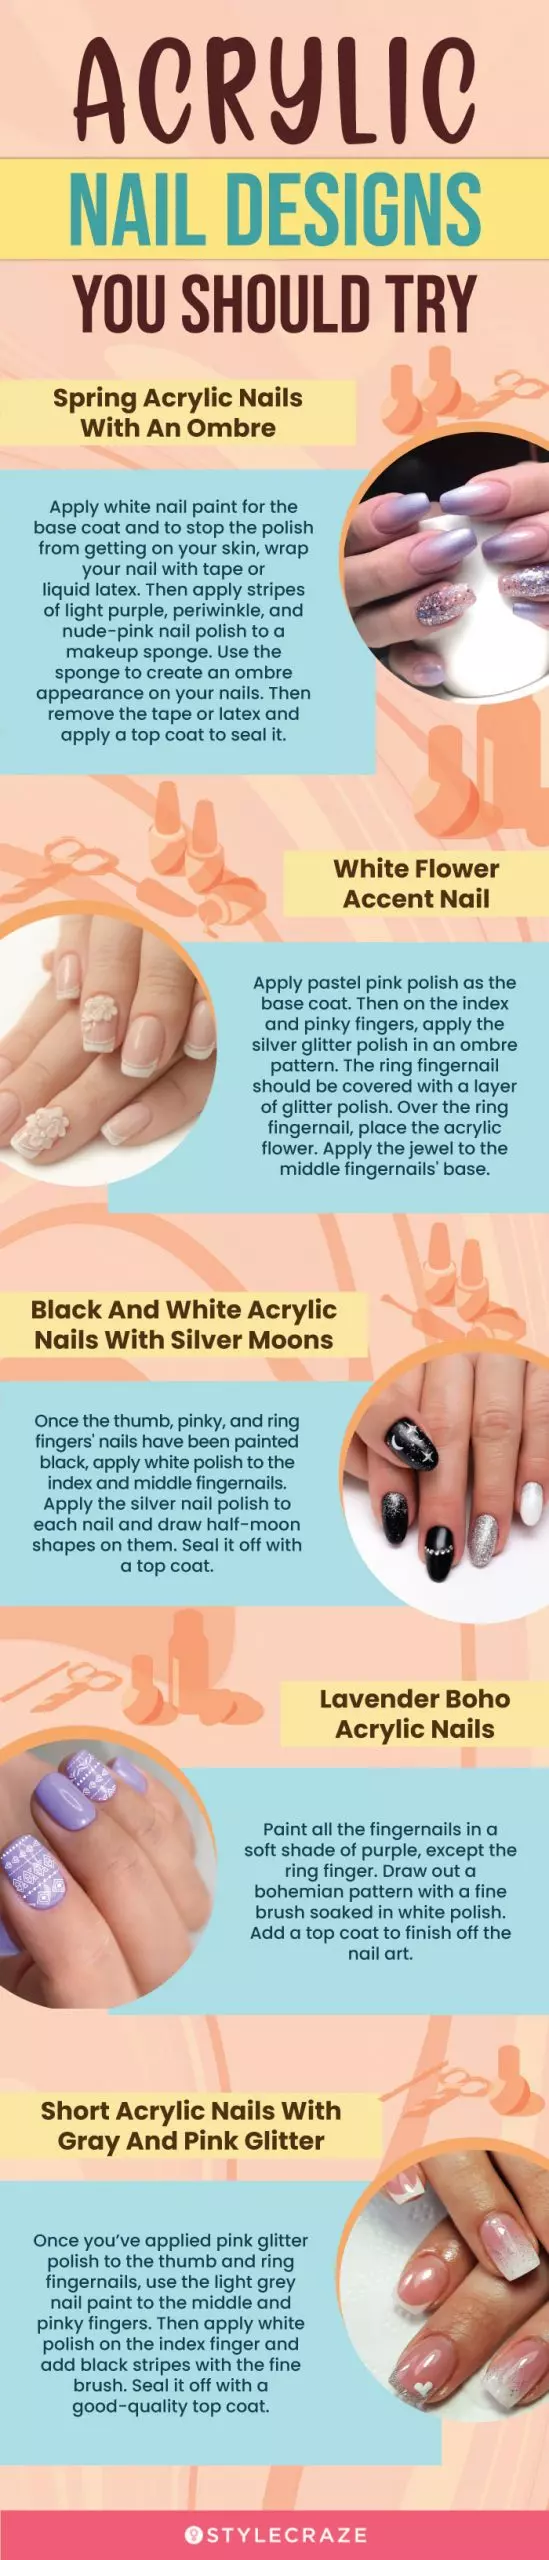
Infographic: Acrylic Nail Designs You Should Try
Acrylic nails have a reputation for being extremely lengthy and challenging to maintain. However, if you want you can get short acrylic nails. Your nails can look better and be stronger with short acrylic nails without the issues that come with long nails. With acrylic nails, there are numerous choices to create minimalistic yet stylish nail designs. So, check out the infographic below to discover interesting acrylic nail ideas.
The best acrylic nail designs can elevate your nails from drab to fab! Acrylic nails are crafted from a monomer and a powder that can be formed into a dough when combined. This dough is set onto the natural nails to make them look bigger and shapely. It is a great choice for those whose nails are brittle or take a long time to grow out. Acrylic nails also give you the chance to play around with many designs without harming your natural nails that lie underneath. So, take inspiration from the gorgeous designs listed here, be your own nail technician, and flaunt your nails as much as you want.
What are some tips for choosing the right acrylic nail art for events?
Consider the type of event it is to choose the best nail design. For example, opt for nude or pastel nail paints with delicate floral patterns for wedding and engagement ceremonies and bold colors with rhinestone designs for modern evening parties. You can consider seasonal designs such as snowflakes for Winter events, vivacious designs (sunset gradients and ocean waves) for summer events, and floral motifs (daffodils, cherry blossoms, and tulips) for Spring events.
What’s the difference between acrylic and gel nails?
While both are artificial nail extensions, gel nails give you a glossy look and acrylic nails are sturdier.
What is stronger acrylic or dip?
Dip nails are stronger and last longer than acrylic nails.
How long do acrylic nails last?
These can last anywhere in between 6-8 weeks with refill and touch-ups every 2-3 weeks.
Can I shower with acrylic nails?
Yes, you can, but, you should try and avoid keeping your nails wet for a longer period of time.
Personal Experience: Source
StyleCraze’s articles are interwoven with authentic personal narratives that provide depth and resonance to our content. Below are the sources of the personal accounts referenced in this article.
Community Experiences
Join the conversation and become a part of our empowering community! Share your stories, experiences, and insights to connect with other beauty, lifestyle, and health enthusiasts.


